
About a month ago I came across a blog post from McCall’s Patterns which included a discussion about the confusion expressed by their customers about size selection when they are buying patterns versus ready to wear. There was much discussion about whether the pattern companies should align their sizing with ready to wear to avoid confusion when selecting the right pattern size (???)
As most people would be aware, there are no sizing standards in ready to wear clothing in Australia (or elsewhere I suspect). Even if the industry is using standardised slopers/blocks, the preferences for grading between sizes and ease vary widely from brand to brand (which is why when we find a brand that “fits” we usually stick to it).
The subject of pattern sizing comes up with all students sewing their own garments – “What size do I buy?”, “I can’t be a 12 – I only buy size 6 in tops!”, “I buy the right size pattern but they are always too big when I make them up.”
Most of these issues can be addressed by gaining an understanding of ease. There are two types of ease. The first is wearing ease which is added to the basic body measurements so that the wearer can move and breathe in a very fitted garment. This is the base from which all designs are then developed.
The second type of ease is called design or fashion ease. The amounts used are at the discretion of the designer or pattern company to achieve the “look” they want or that fashion demands.
Another consideration is the fact that garment styles (including design ease) change over time:
- tiny waists and full skirts of Dior’s “new look” in the 50’s
- short, minimally shaped garments of the “mod” era in the 60’s
- loose fitting, flowing styles of the “boho” era in the 70’s
- over the top closely fitted garments with wide shoulders and deep armholes in the bling of the 80’s
- pared back more structurally “simple” and oversized styles in the 90’s
- the active wear as day wear styles of the early 2000’s
- spandex in everything and close fitting styles of today
Through all of this fashion change, body shapes have evolved as well. A lot of young women are much taller than those of us born in the 1940’s-50’s. Women’s lifestyles have also changed enormously. There is much more focus on exercise as well as many more sedentary jobs and leisure pursuits.
Unfortunately today we live in era of mass production and the demand for ever cheaper clothing. Most people are not aware of how wonderfully comfortable it feels to wear a custom made to measure garment compared to “if it zips, it fits” – no matter what the price!
It is totally unrealistic to expect that patterns will fit each individual straight out of the envelope. The cost alone would be prohibitive and this has been the case since paper patterns were introduced for the home sewer in the late 1900’s.
The crux of the matter is whether our own individual body measurements coupled with our preferences regarding the amount of ease we are comfortable wearing matches the finished sizing of the garment (or indeed commercial pattern).
Major factors affecting the fit of garments are skeletal frame and body posture, often to a far greater degree than body size.
So where does this leave us as sewers?
We have the ability to take the elements of the current fashion and incorporate them into stylish, comfortable garments which flatter and are made to fit our own individual body shape and proportions.
It does not matter what size or shape we are, by accepting what is (we cannot change our skeletal frame!) and making friends with the tape measure, we can learn to adjust commercial patterns for our own individual requirements.
My post on 20th July, 2015 covered how and where to measure the body; selecting the best pattern size; the order of making pattern alterations and the vital importance of making a trial garment (called a toile or muslin).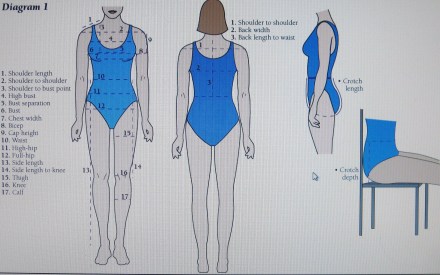
In this post, I will discuss how to prepare a commercial pattern to assess what initial changes can be made before cutting the toile.
Additional Body Measurements:
When taking measurements, wear the undergarments you intend to wear with the finished garment and a close fitting garment (leotard) if desired. Also wear the type of shoes you will wear with the finished garment. The height of the heel affects the spinal alignment and posture.
To assist when taking these measurements, mark the true waist with tape or elastic tied into position – ensure that it is parallel to the floor all round the body. (This position may not be where you want the top of pants or a skirt but it is an absolutely vital reference point for alterations.)
Also use sticky dots to mark the position of each side seam level with the full bust, waist, and high and low hip positions. Be sure to keep the alignment of the side seam perpendicular to the floor.
As well as the usual circumference measurements (bust, waist, hips, etc), there are additional horizontal measurements which will greatly help flat pattern alteration:
- shoulder length (from base of neck to directly up from arm crease)
- angle of shoulder slope/shoulder depth (align a square with the base of the neck and measure depth below that squared point)
- shoulder to shoulder – front and back (shoulder bone to shoulder bone)
- cross chest width (where the arm joins the body)
- cross back width (where the arm joins the body
- front and back waist from side seam to side seam
- front and back high hip and low hip from side seam to side seam
Front vertical measurements are taken from:
- depth of cross chest position – high neck point (where neck meets shoulder) to cross chest (level with where arm joins body)
- depth of bust position – high neck point (where neck meets shoulder) to bust point
- depth of under bust – from bust point to bottom edge of bra cup
- midriff – from bottom edge of bra cup to waist
- depth of high hip along the side seam – from bottom edge of waist tape to high hip position
- depth of low hip along the side seam – from bottom edge of waist tape to low hip position crotch depth (tie a cord or shin elastic around thigh at highest point and measure from bottom of waist tape to this position)
- thigh depth from waist – on side seam position
- knee depth from waist – on side seam position
- calf depth from waist – on side seam position
- ankle depth from waist – on side seam position
Additional back vertical measurements are:
- length of upper back – from nape of neck to cross back position (level with where arm joins body)
Marking the Pattern:
To preserve the original pattern, it is a good idea to trace each pattern piece, (complete with all markings, grain line and seam lines) on to grease proof paper or your preferred pattern making paper.
On both front and back bodice, skirt or pant pieces, use a coloured pencil and markers to draw in horizontal lines relating to the position that body measurements are taken. All lines need to be at right angles (perpendicular) to the grain line on the pattern pieces.

Torso reference points
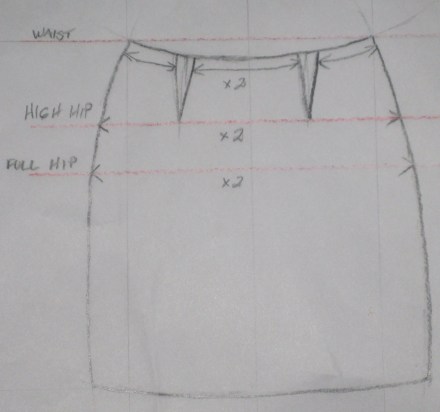
Skirt reference points.
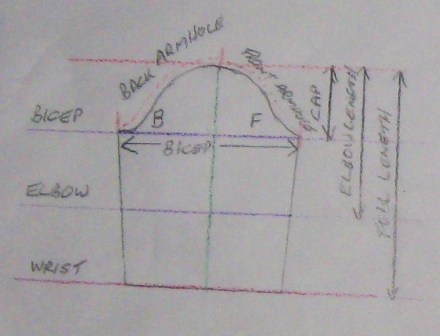
Sleeve reference points.
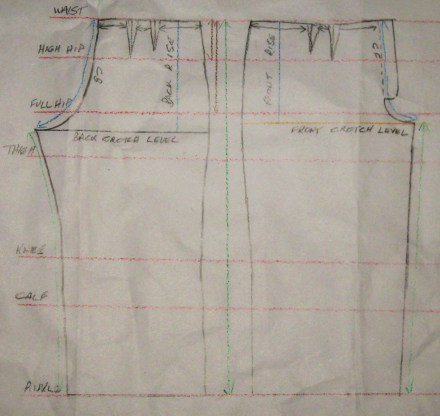
Pants reference points.
In my next post I will discuss how to compare your measurements to the pattern measurements as well as how and where to make alterations so that, when you try on the toile, you will have the pattern shaping in the correct position and enough width to start with. Even though minor adjustments may still be needed, the fitting process will be simpler.
