Initial Flat Pattern Adjustments and Fitting the Shoulder

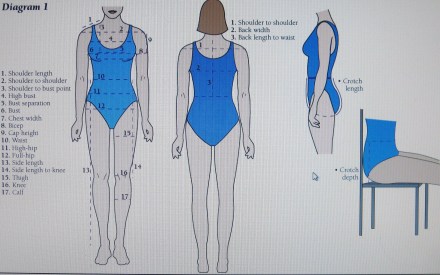
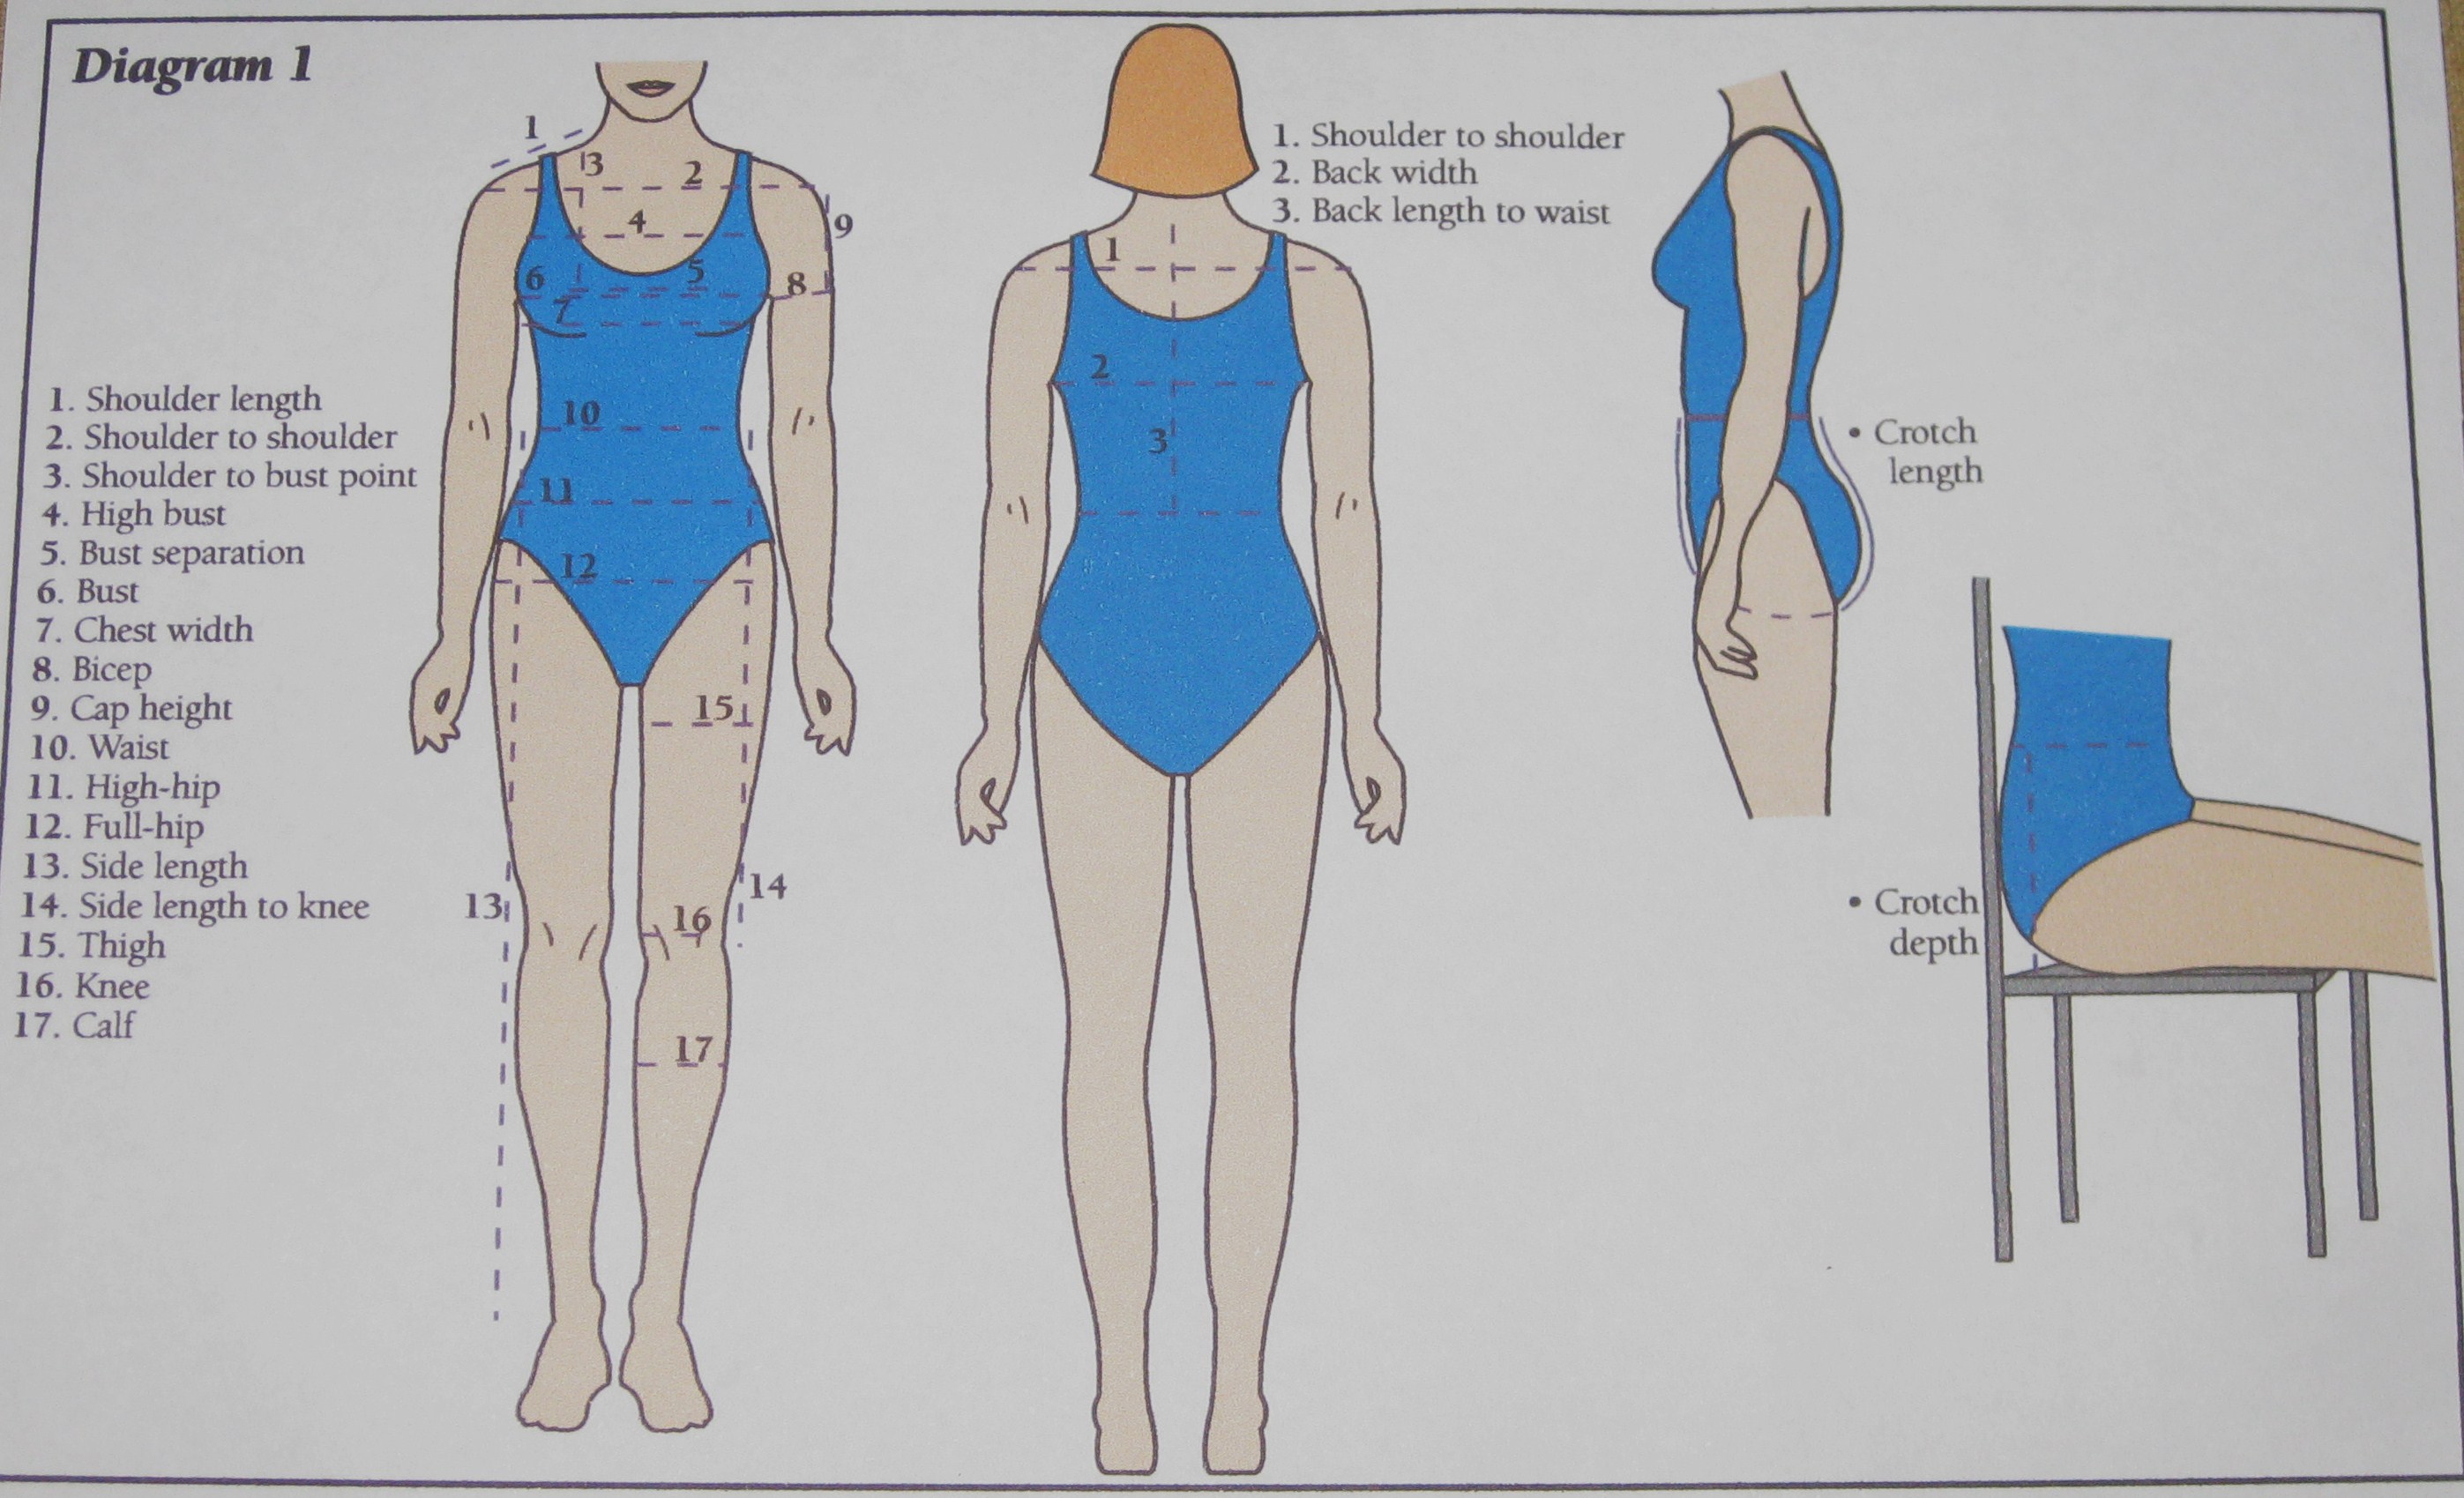
In my last blog, I illustrated where to take the body measurements needed to check the paper pattern before starting to cut out the fabric for a trial garment.

So what to do now!  How and where do we compare the body measurements with the paper pattern?

Using this method takes some time and patience in the beginning but it is well worth the effort in terms of saving time in the future – as well as saving fabric, our sanity and good humour!

The first step involves marking all seam lines and reference points on a traced copy of the basic pattern.  The pattern is then measured at various points to see where body measurements vary from the generic pattern.

In this blog I will show where to mark and measure a bodice starting with the angle of slope at the shoulder.  I discovered this method last year in Issue 178 of Threads Magazine.  Judith Neukam wrote an article called “Preparing Patterns for Fit” in which she demonstrated how to use an angle locator to determine the degree of the shoulder slope.
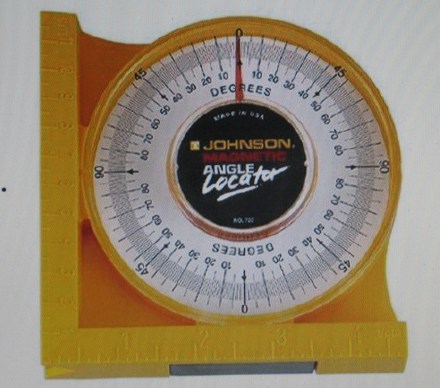
IMG_3882

Angle Locator

As I have narrow, sloping shoulders, I could have shouted, “Eureka!!!!”  – I did restrain myself and went immediately to Google to see where I could buy one of these amazing gadgets.

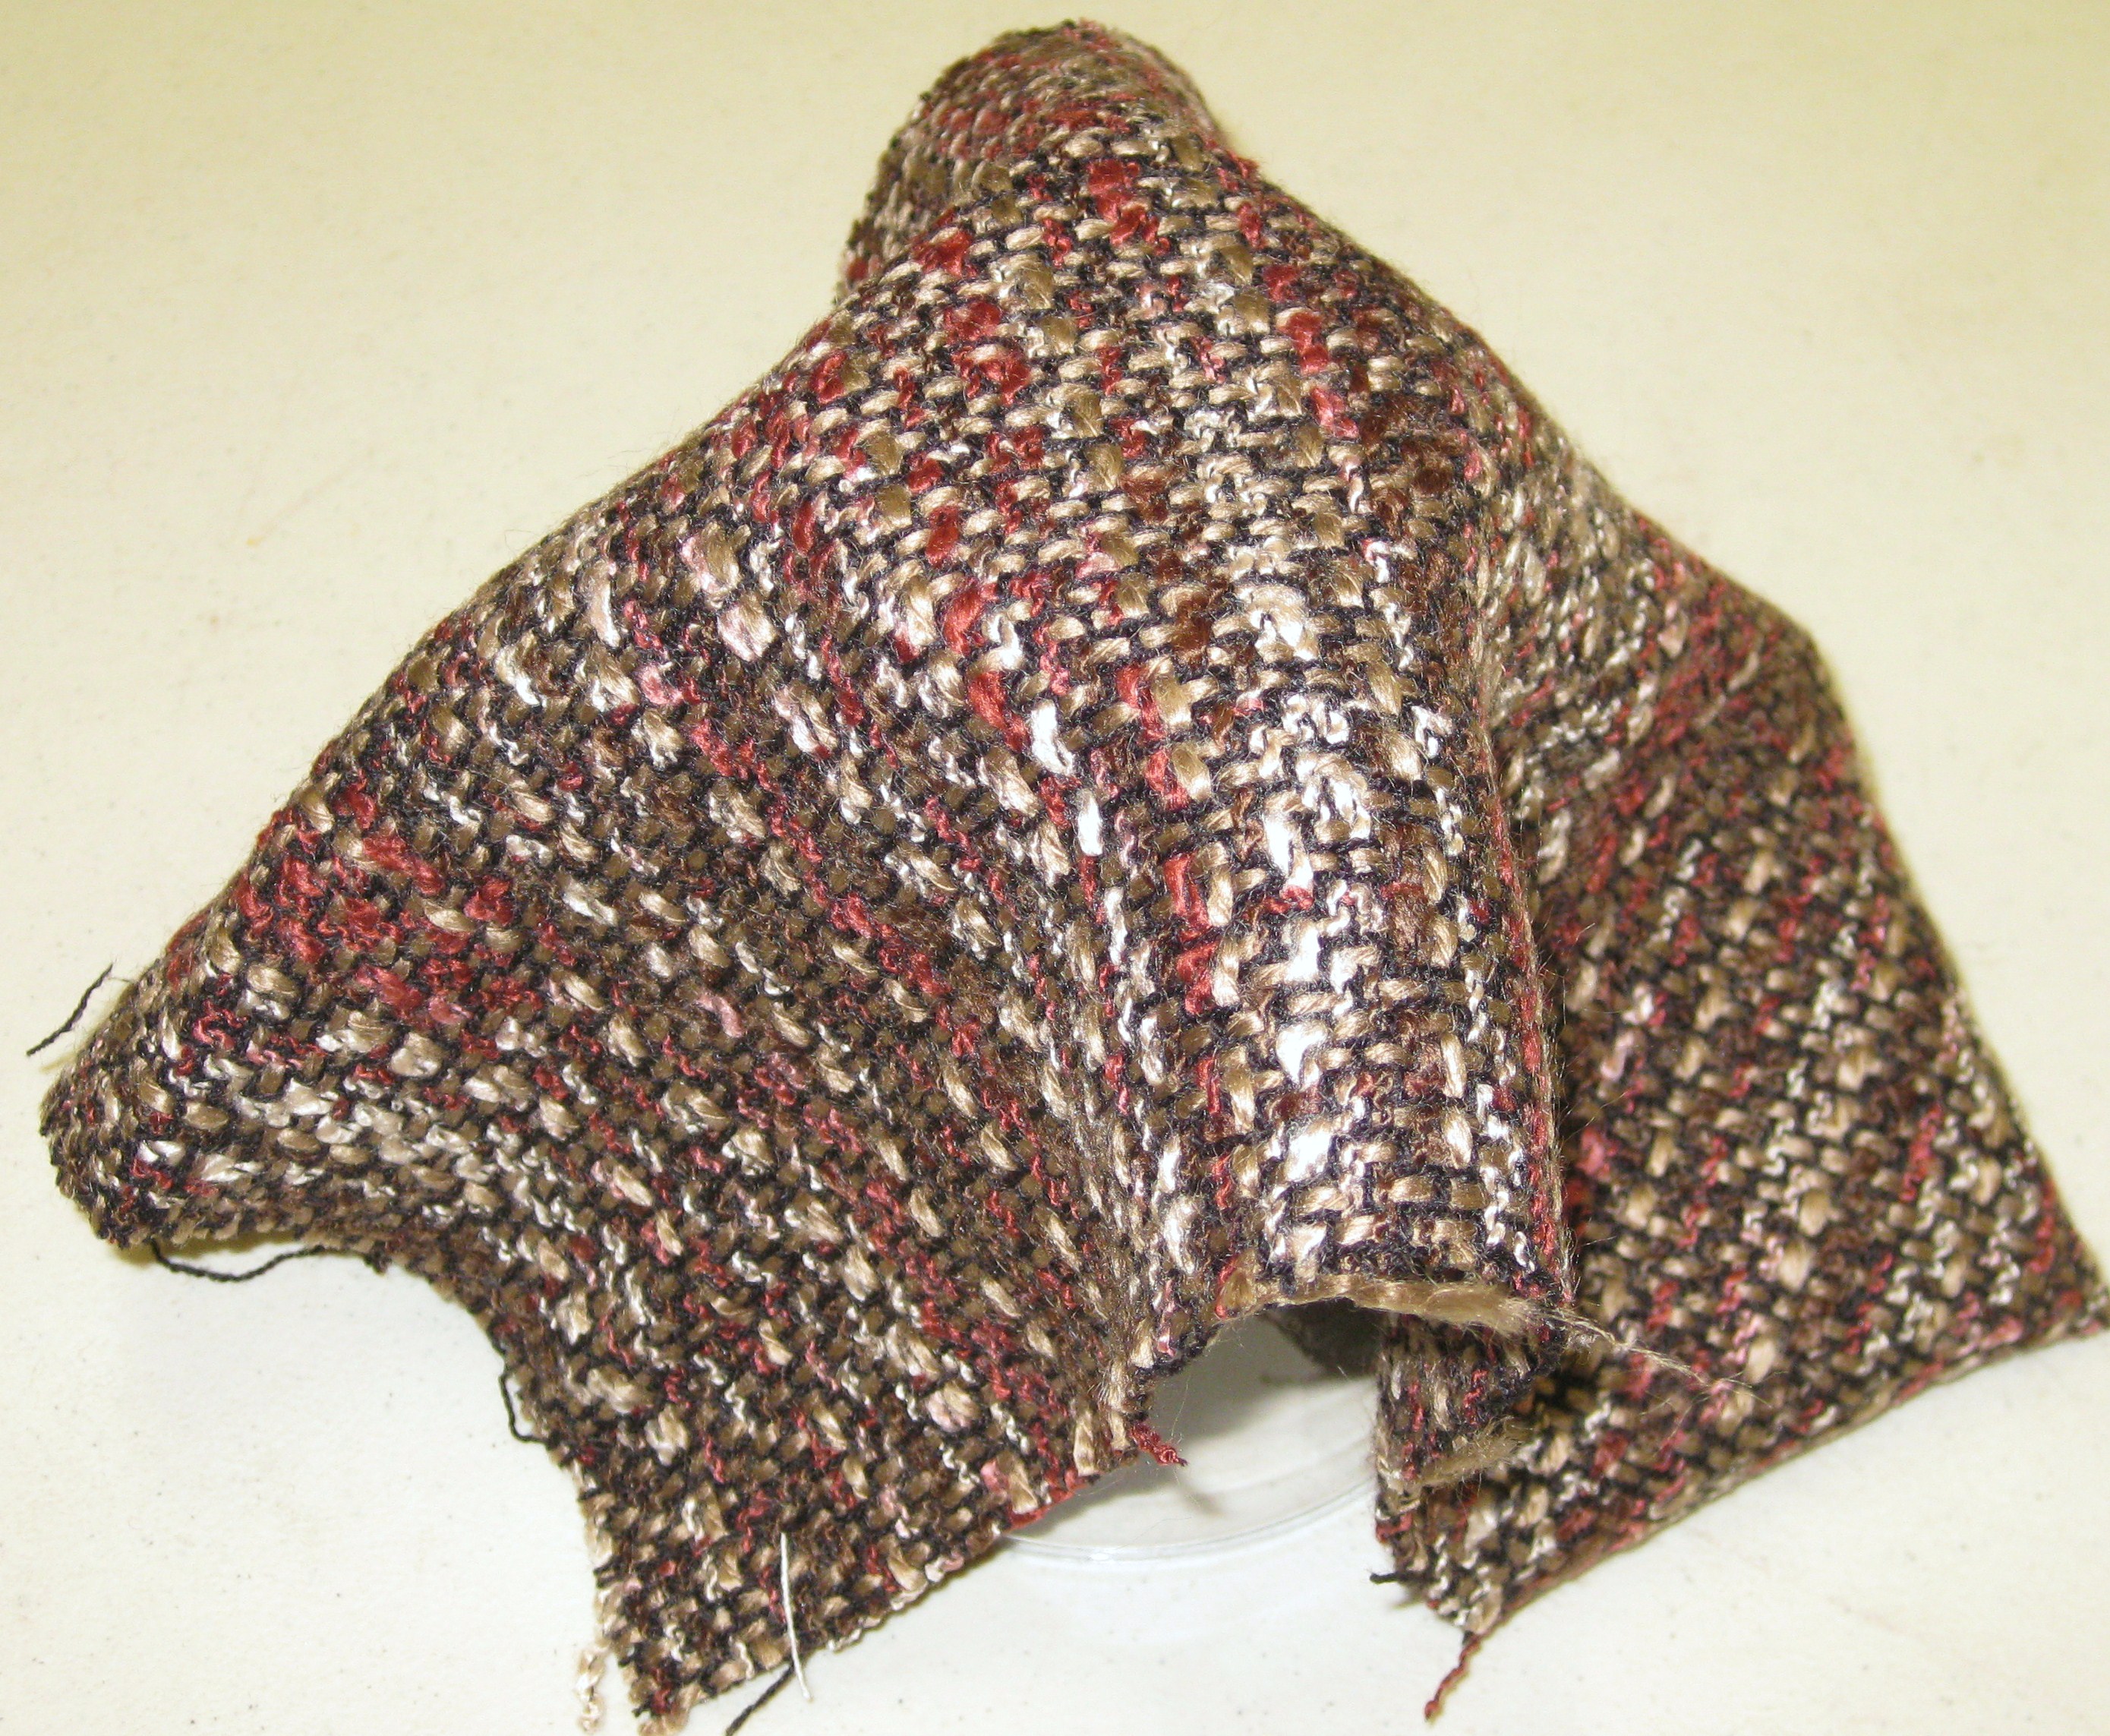
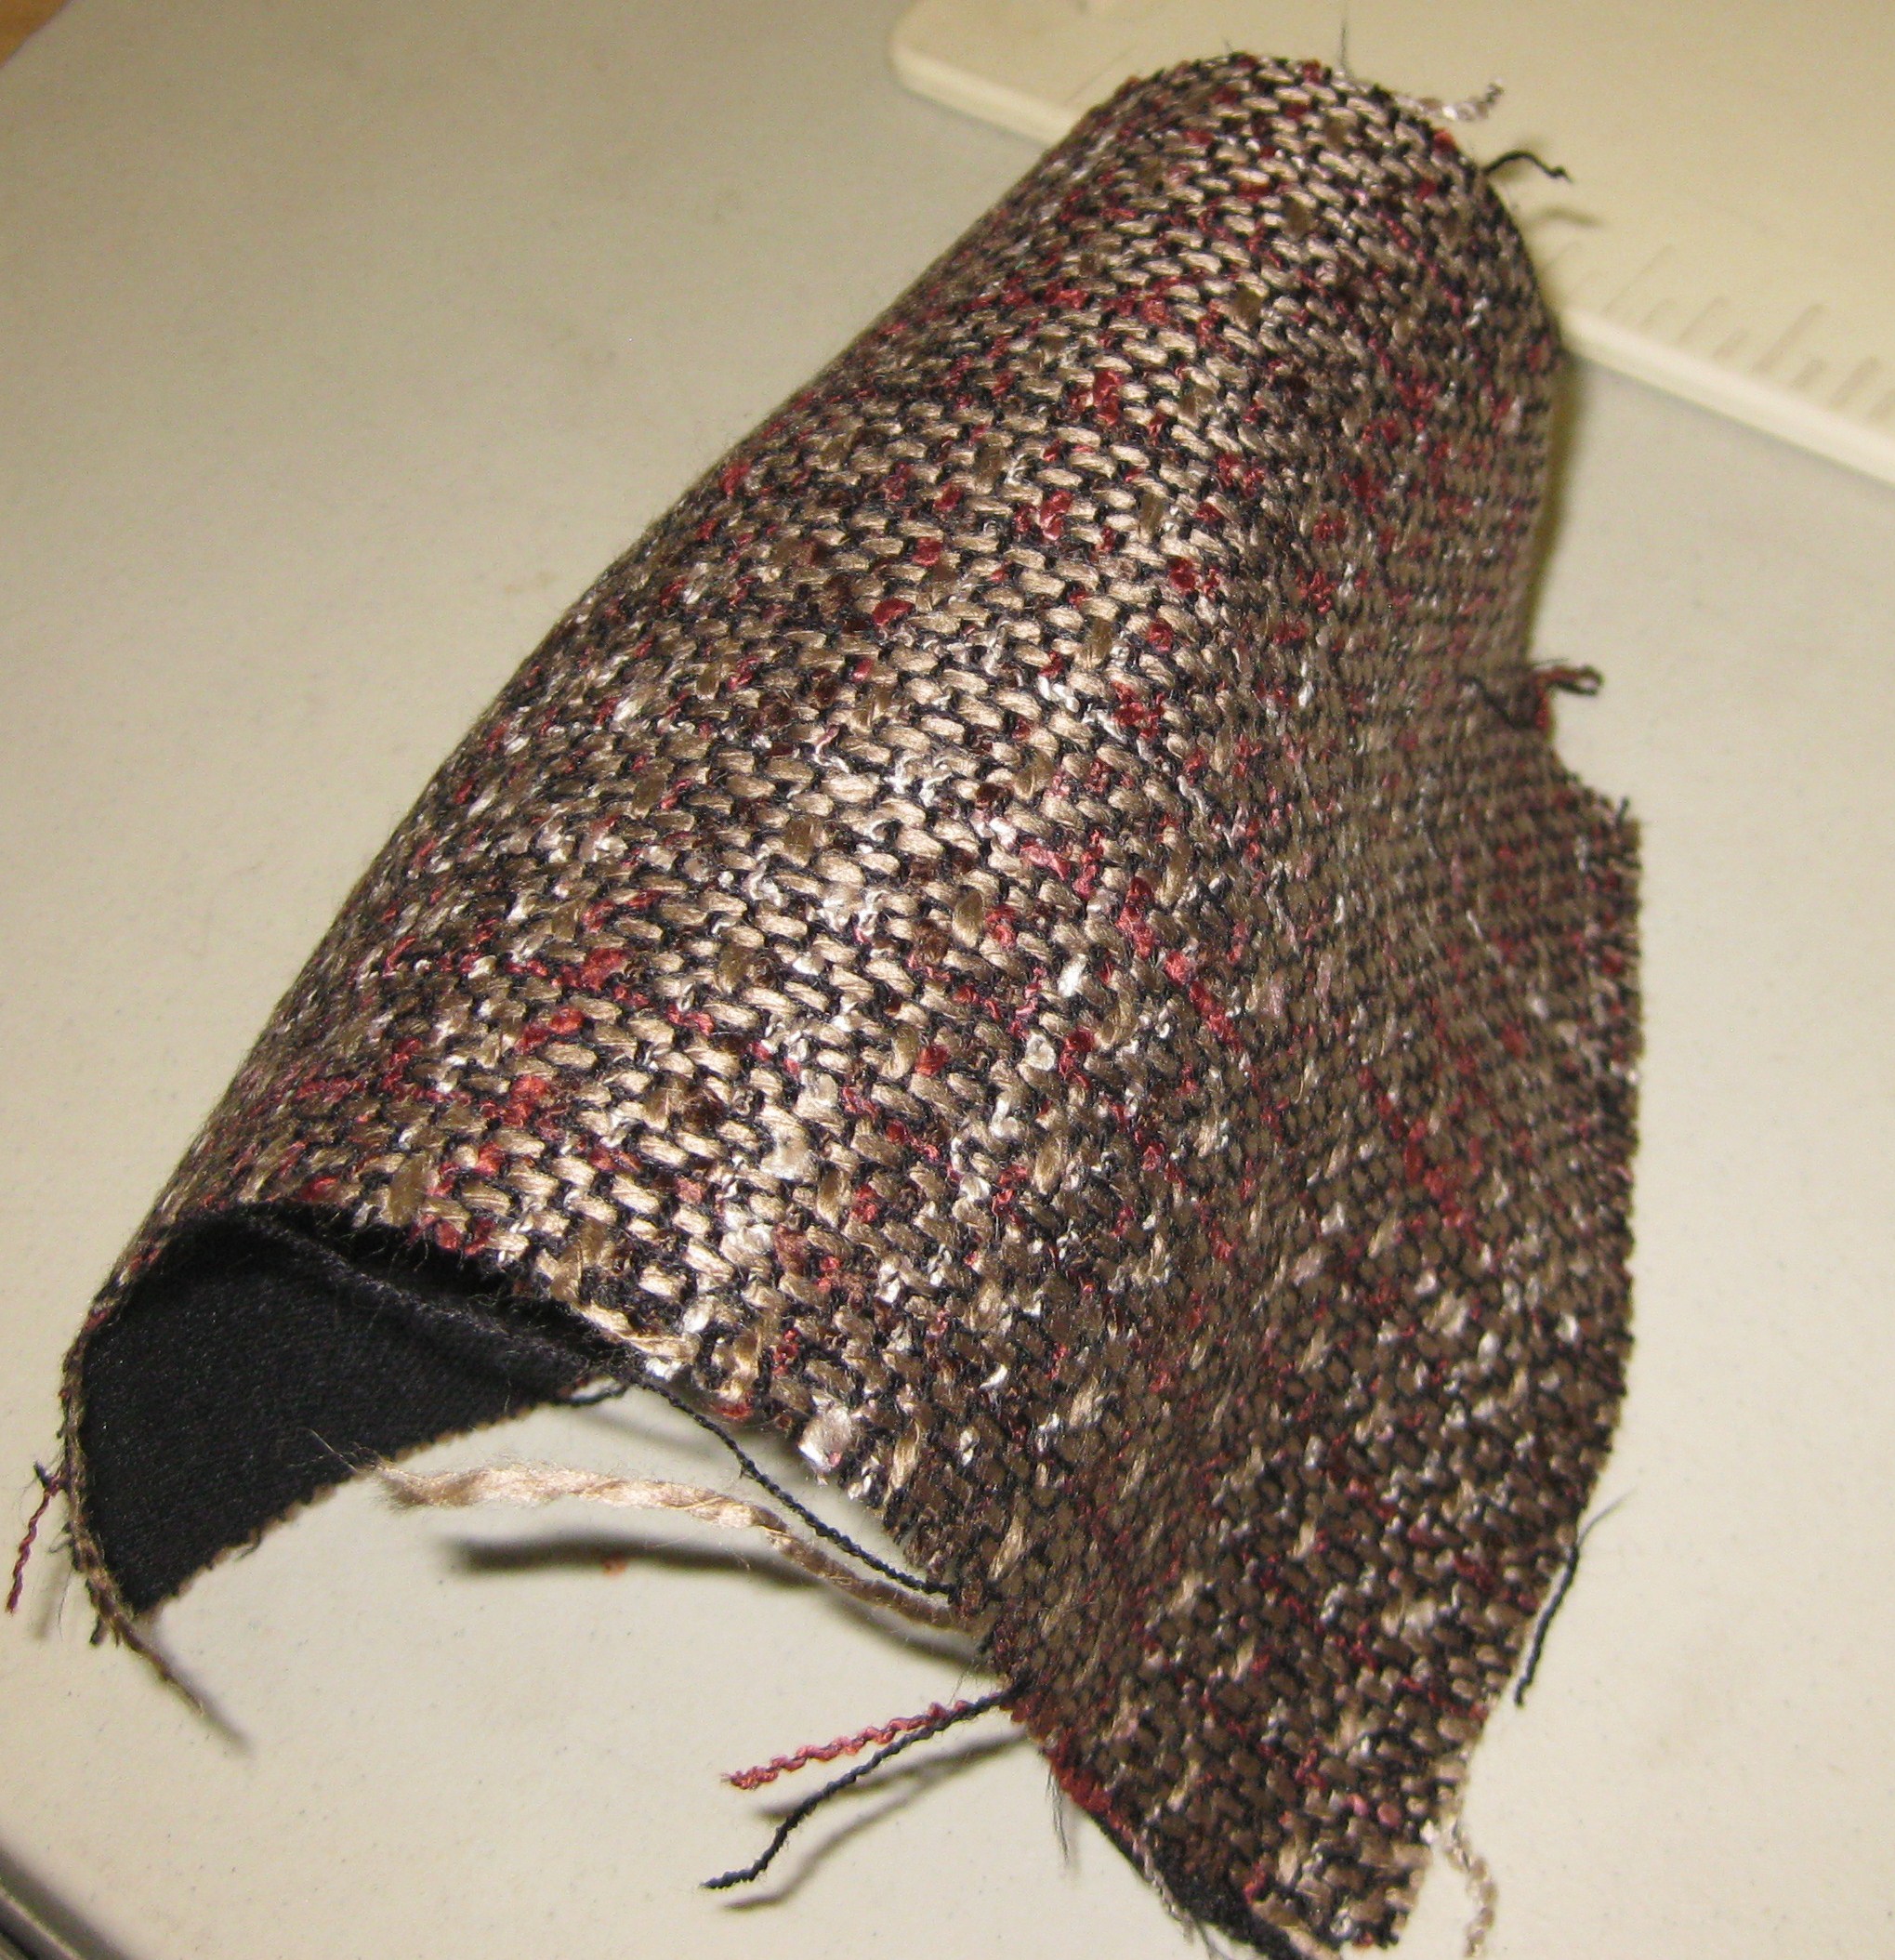
The reason for my jubilation was that I had finally learned a way to measure the  shoulder position accurately which is vitally important to how the garment will fit.  If this angle is not correct, the garment hangs badly with prominent folds – just like it would on a wire coat hanger versus a properly padded coat hanger.

When I located the supplier through Amazon, unfortunately they did not ship to Australia.  However, one of my lovely students was going to the United States and she purchased one for me.  There was much excitement when it arrived and I have been measuring shoulder slopes accurately ever since!

(I have since found a similar item offered by an Australian supplier through Ebay – http://www.ebay.com.au/itm/LEVEL-ANGLE-FINDER-LOCATOR-PROTRACTOR-SATELLITE-DISH-INCLINOMETER-CLINOMETER-/201523298851?hash=item2eebb98223:g:ByMAAOSwVFlT8dZ9)

IMG_3883

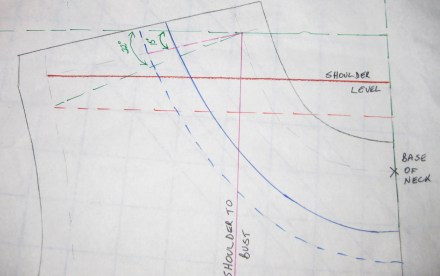
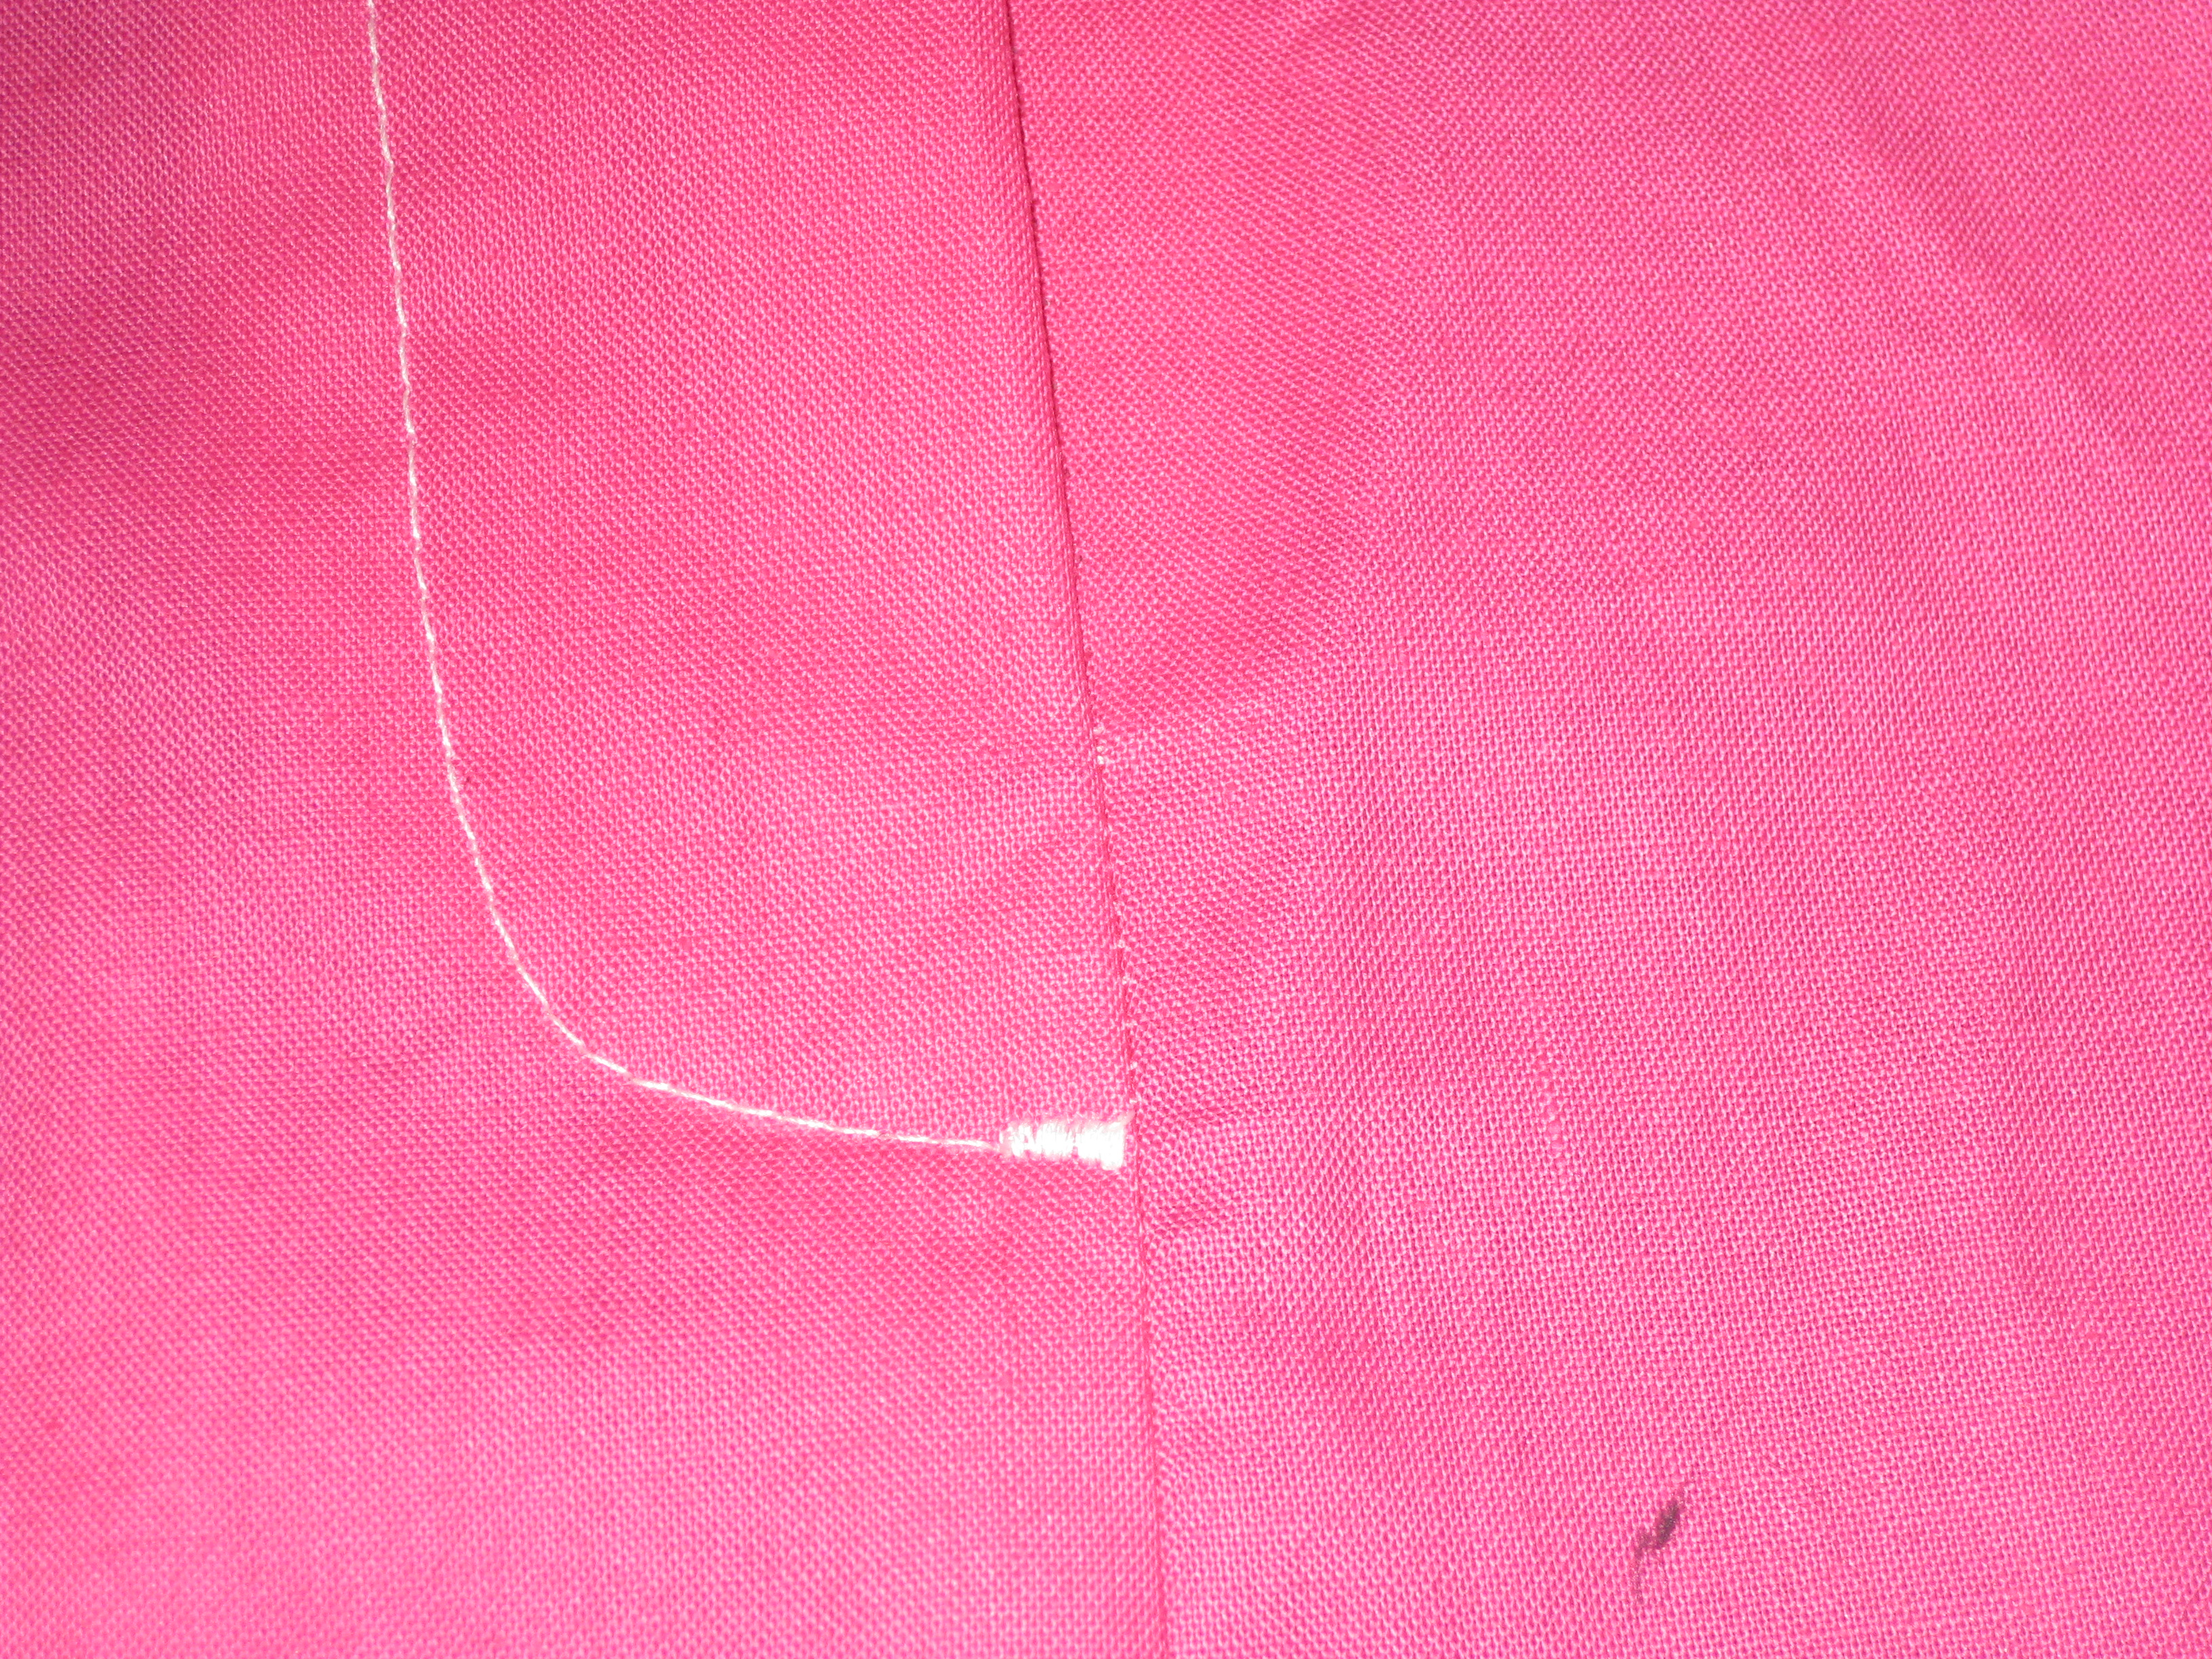
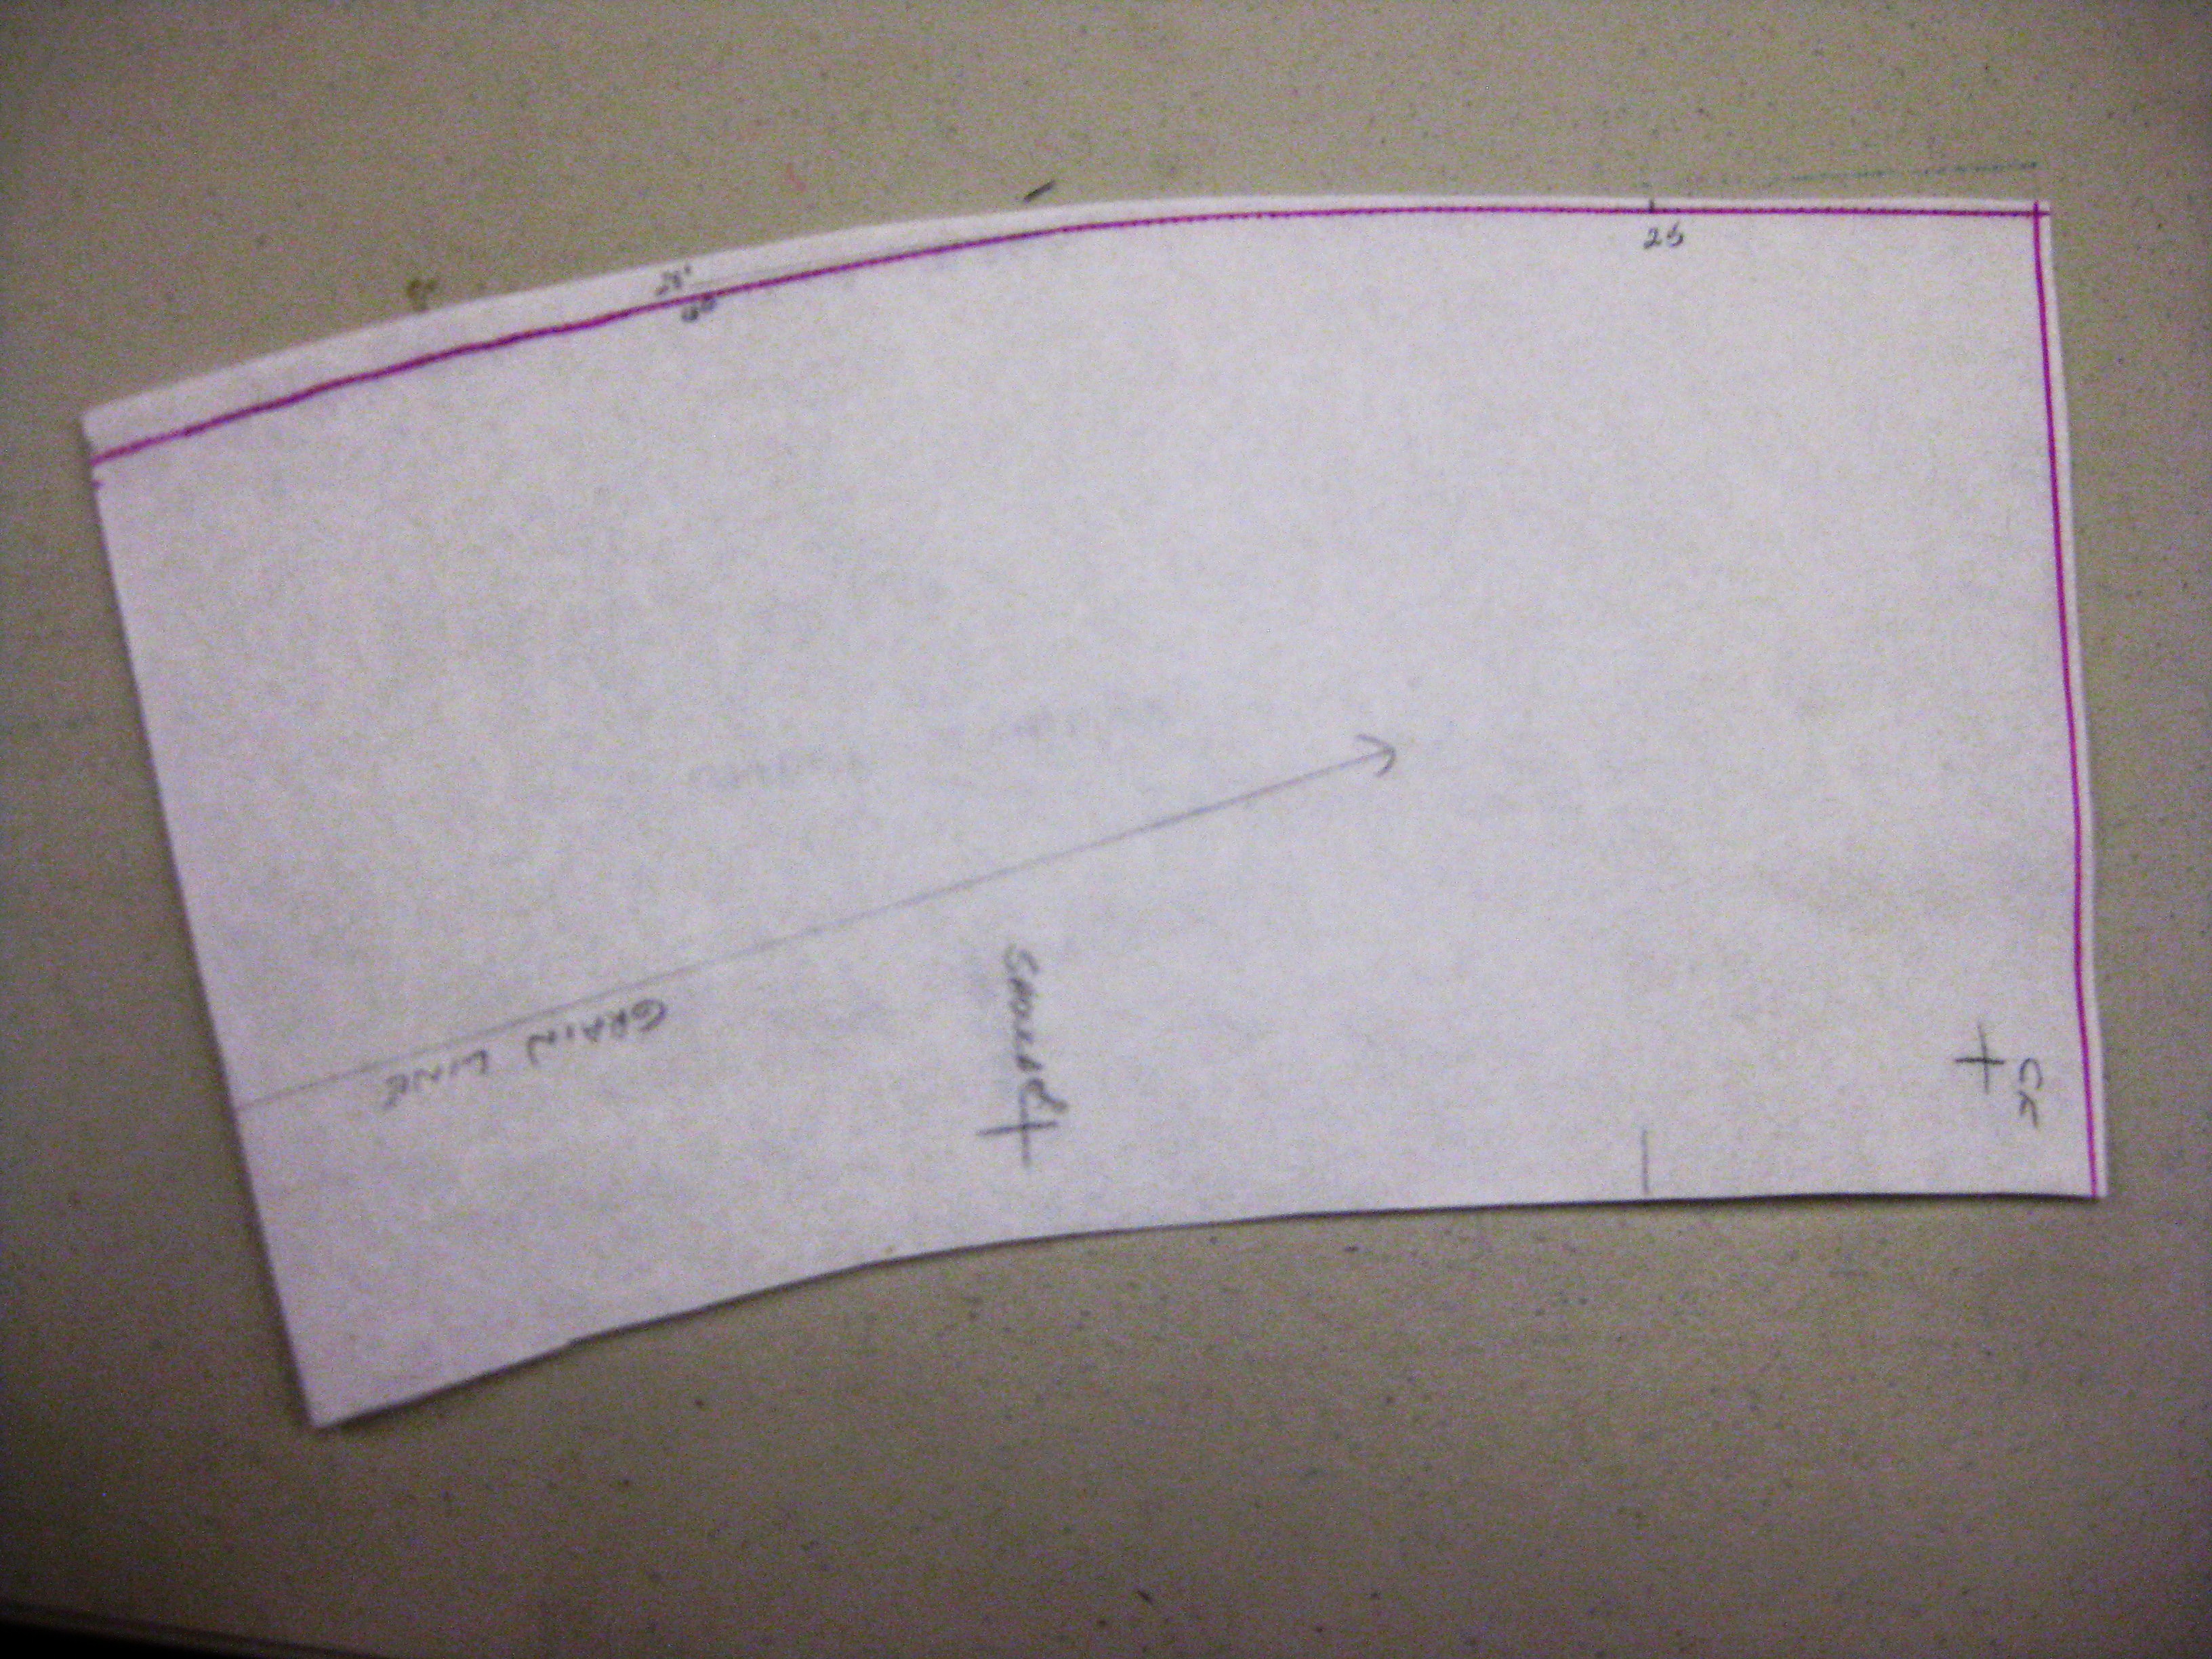
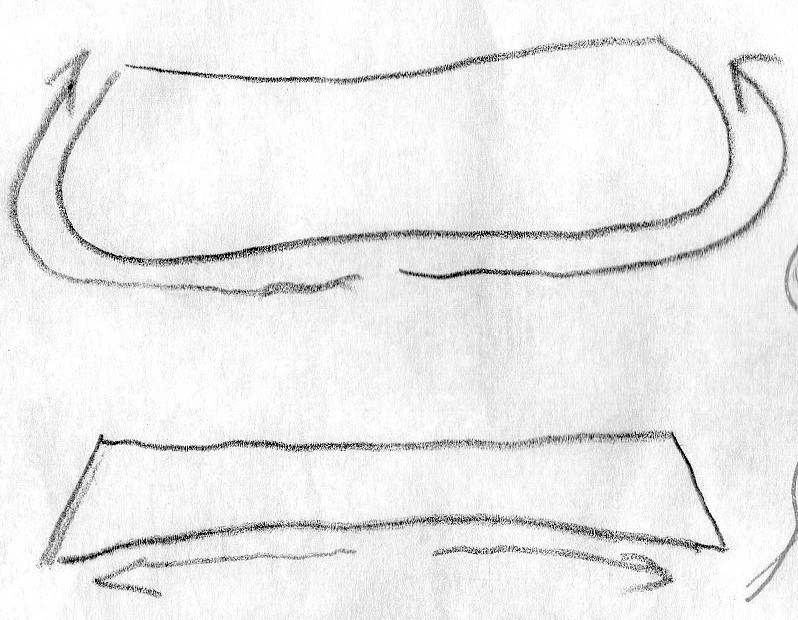
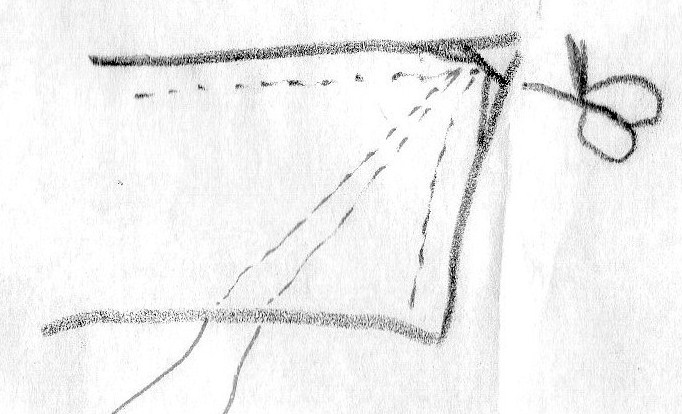
Working on front bodice, extend centre front line and square a line from the highest shoulder point to the centre front. When using a pattern with a narrower shoulder seam and lower neckline, extend the shoulder seam to the base of the neck stem and use this new point to square a line to the centre front.

After checking the shoulder angle on at least 20 commercial patterns, I have discovered that they all use an angle of approximately 15°.  From checking the angle of quite a few of my students, I have found only one with that shoulder angle – they mostly range from around 18° to 24°.

IMG_3871

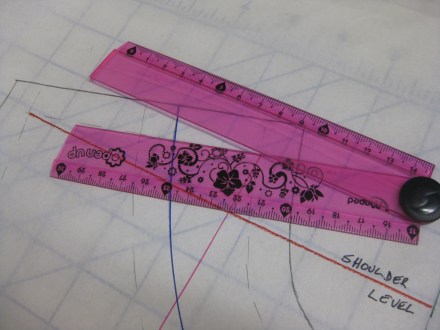
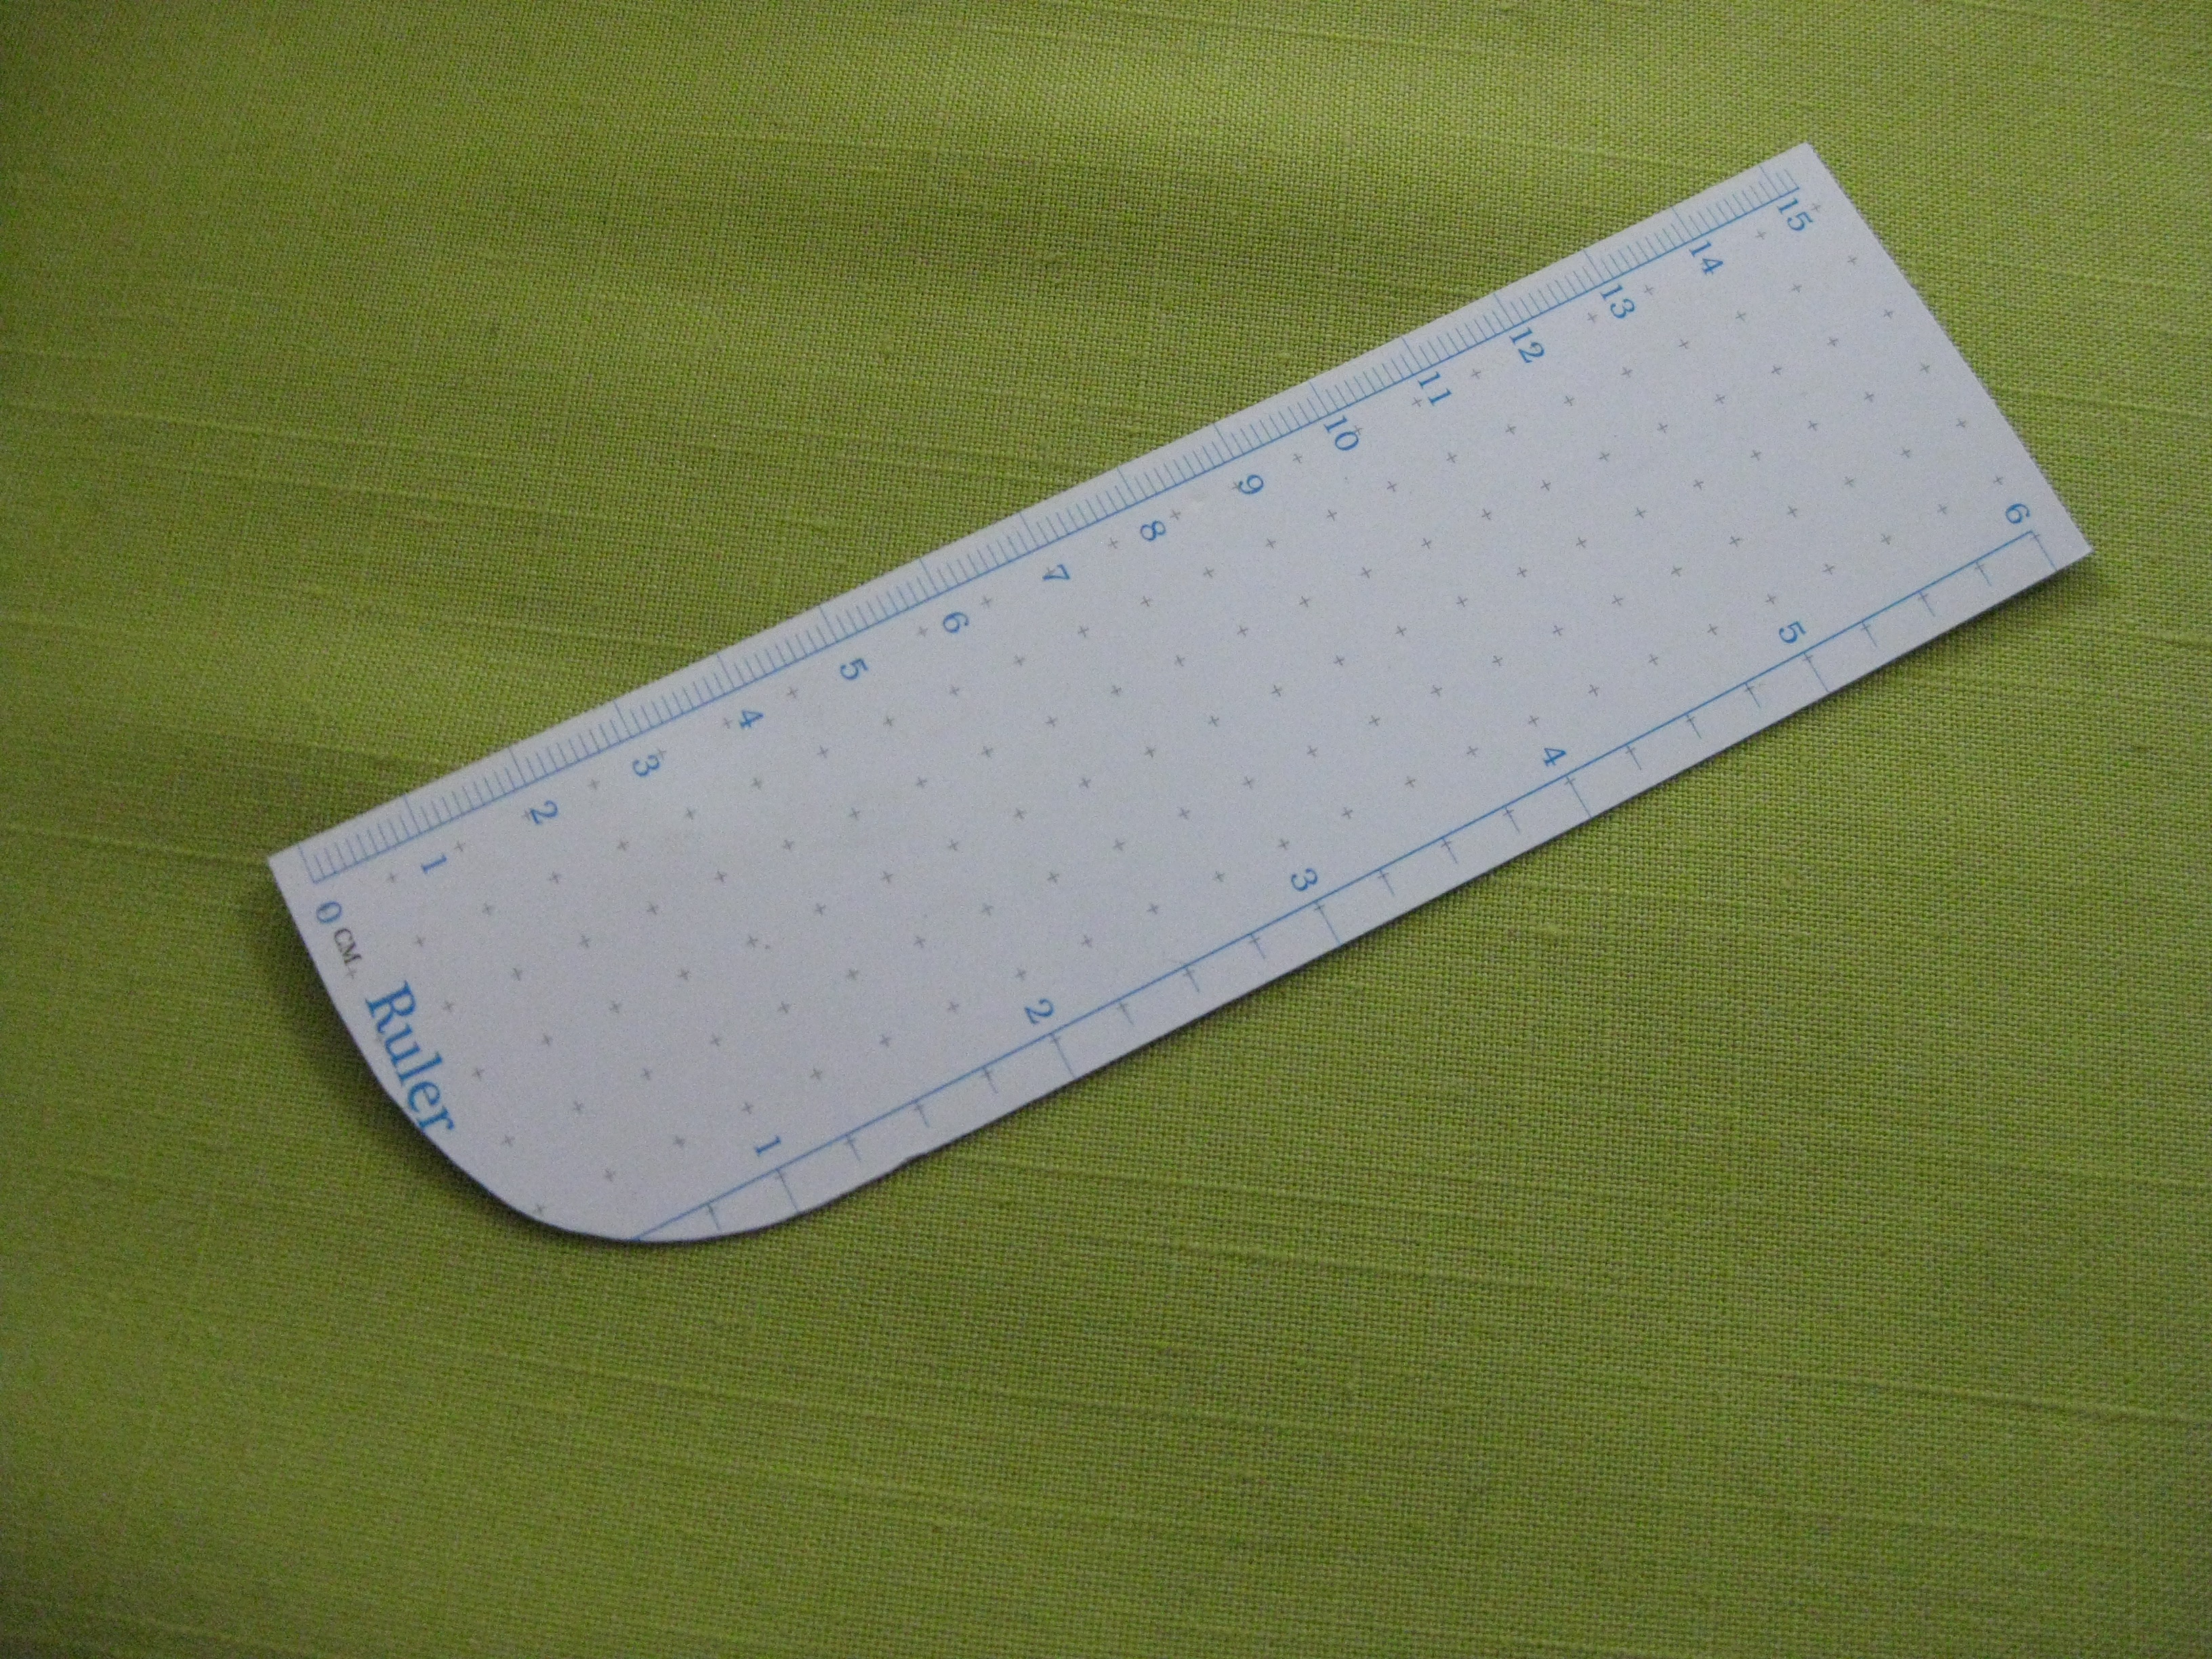
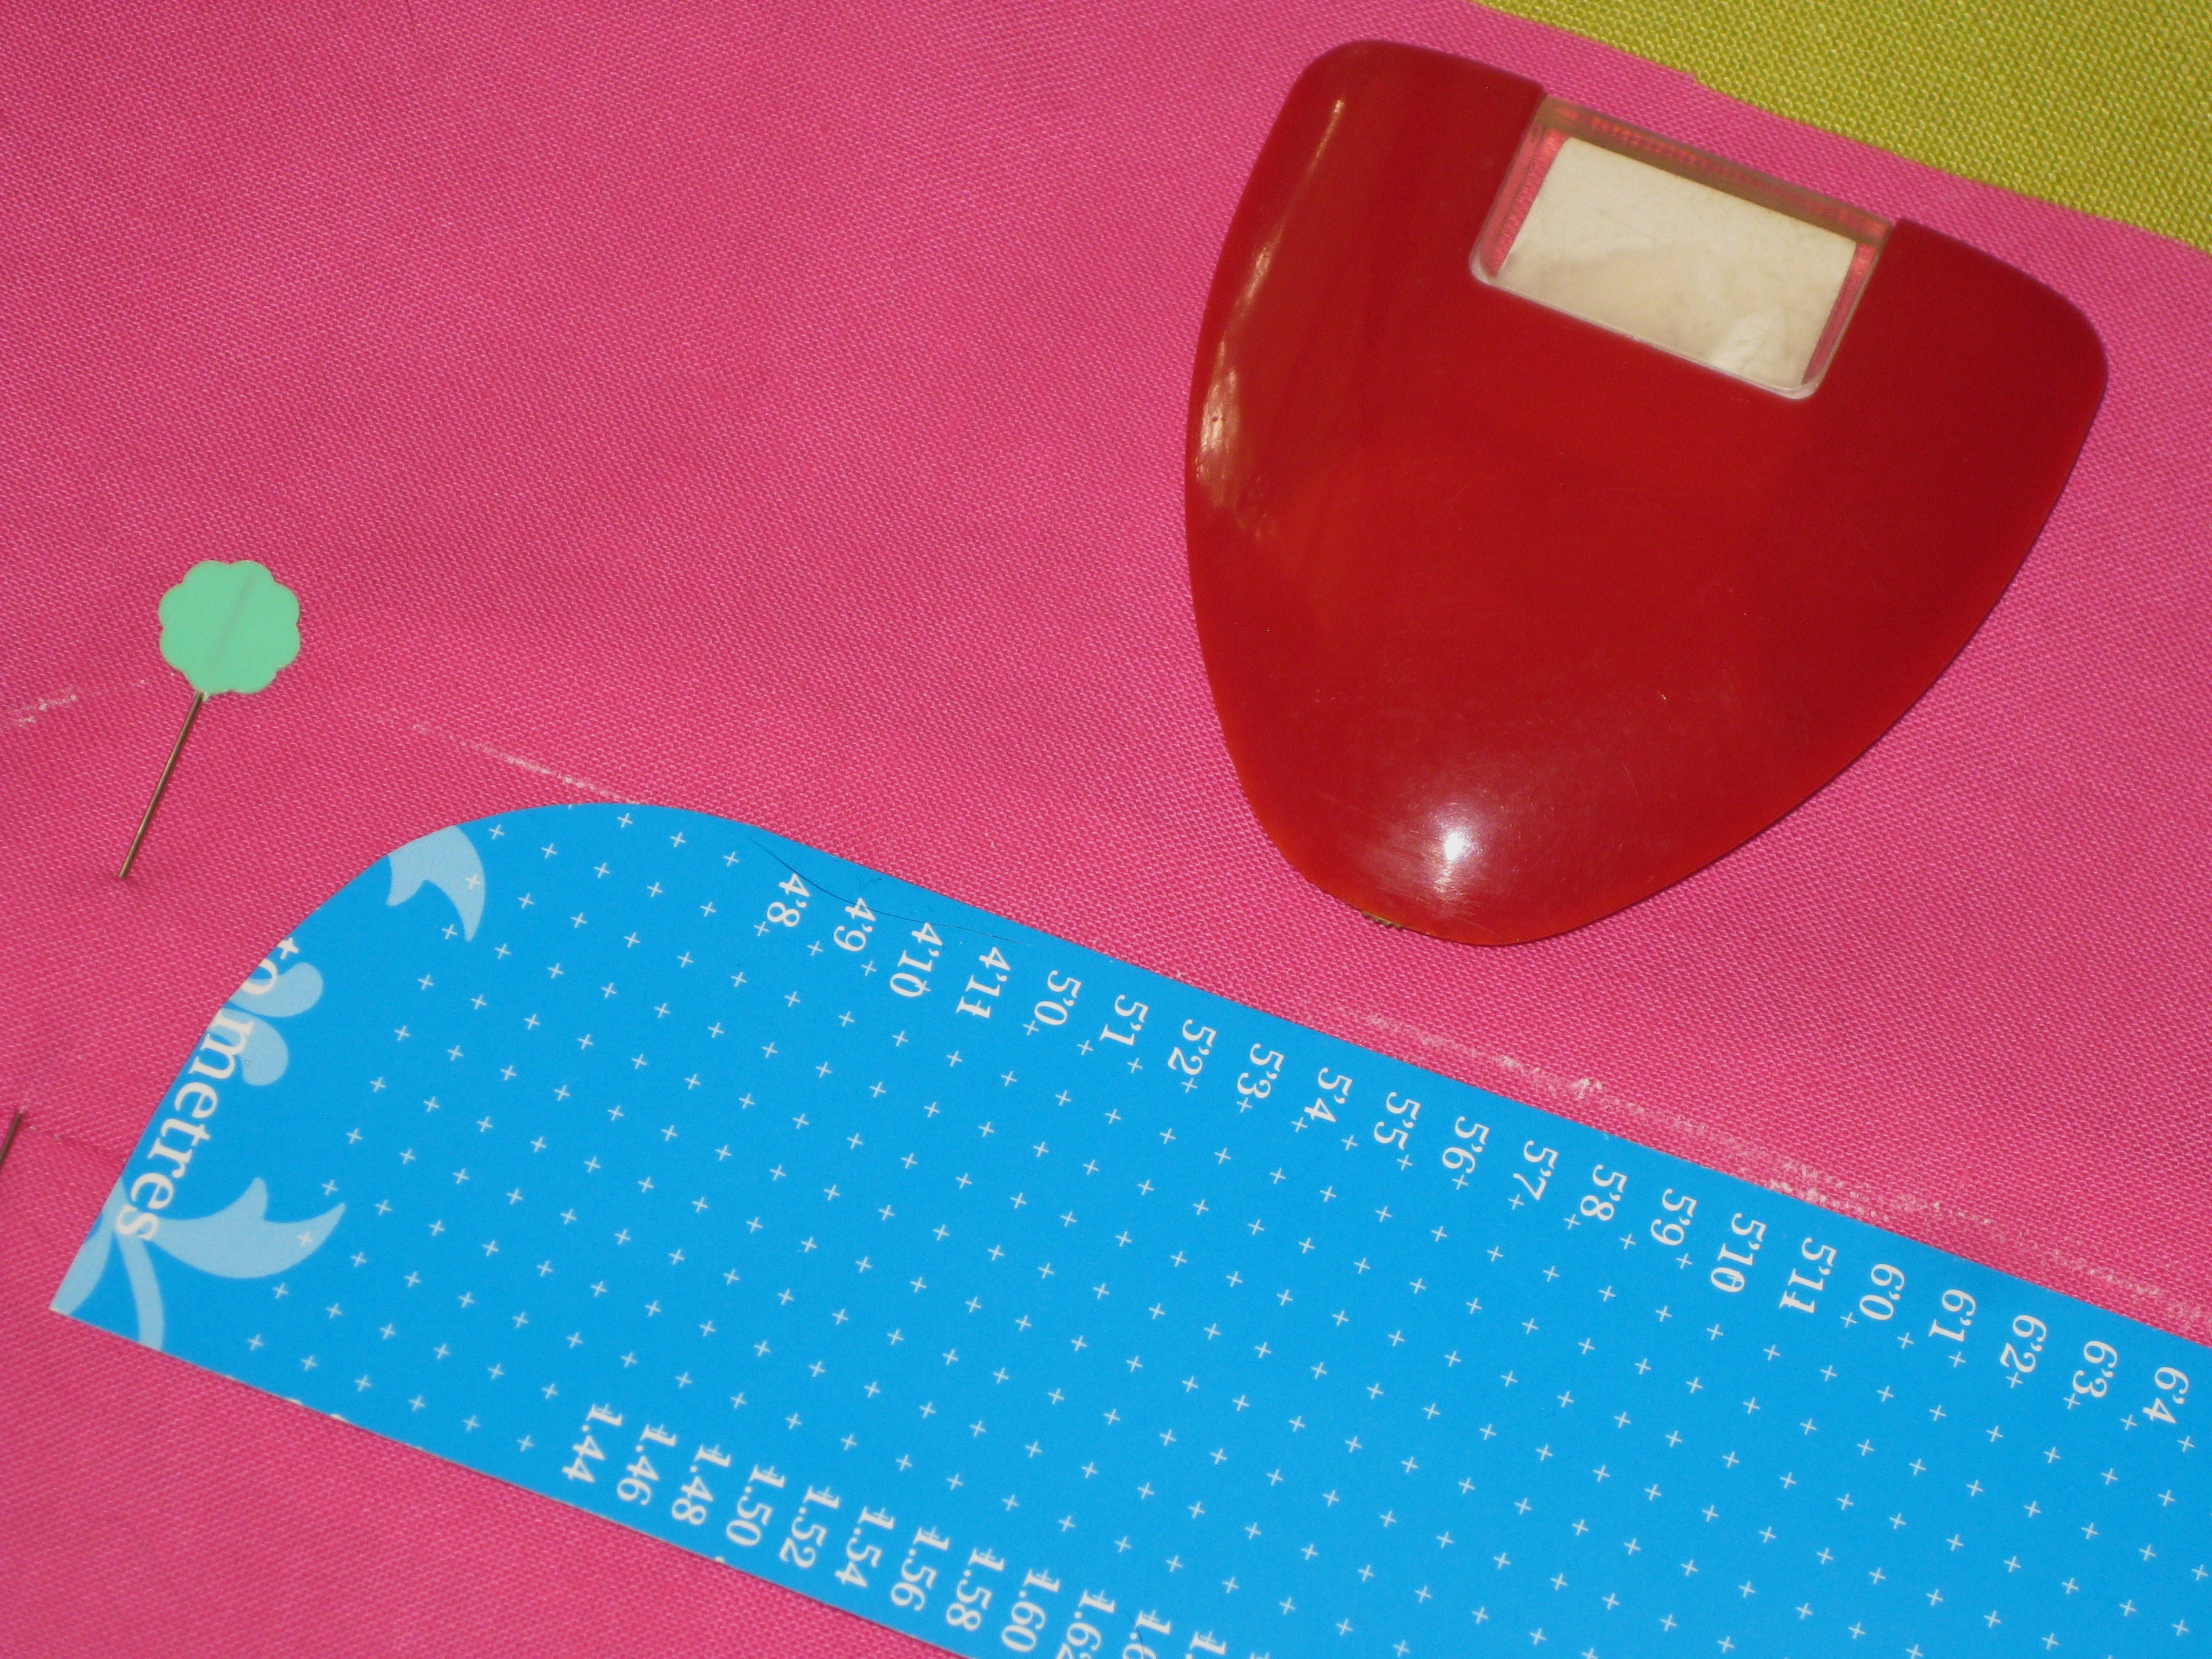
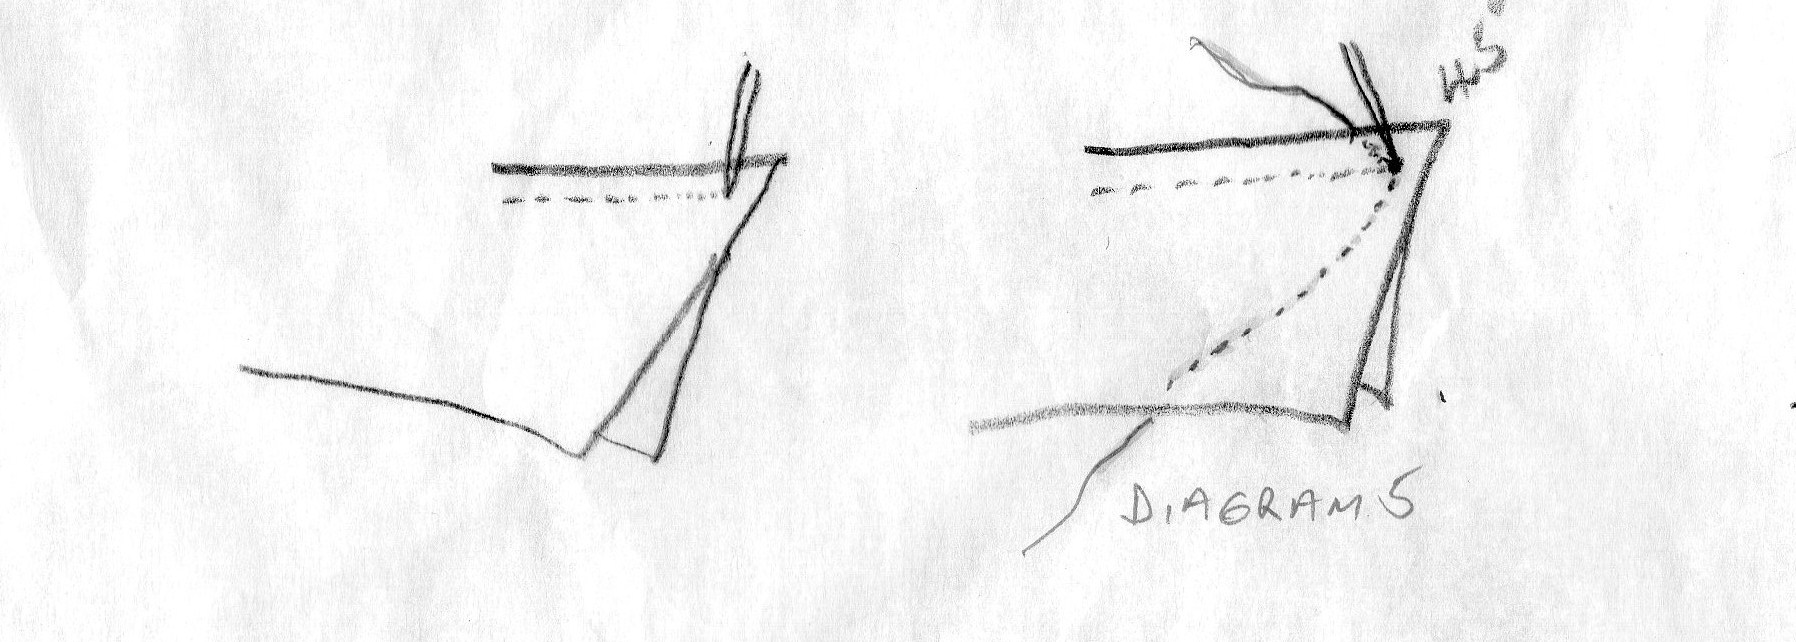
An inexpensive angle ruler can be used to measure the original shoulder level which is measured along the line squared from the centre front at the highest shoulder point.

IMG_3872

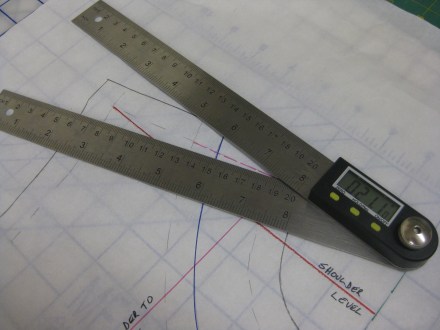
Digital angle ruler set to 21 degrees. Draw new shoulder line position.

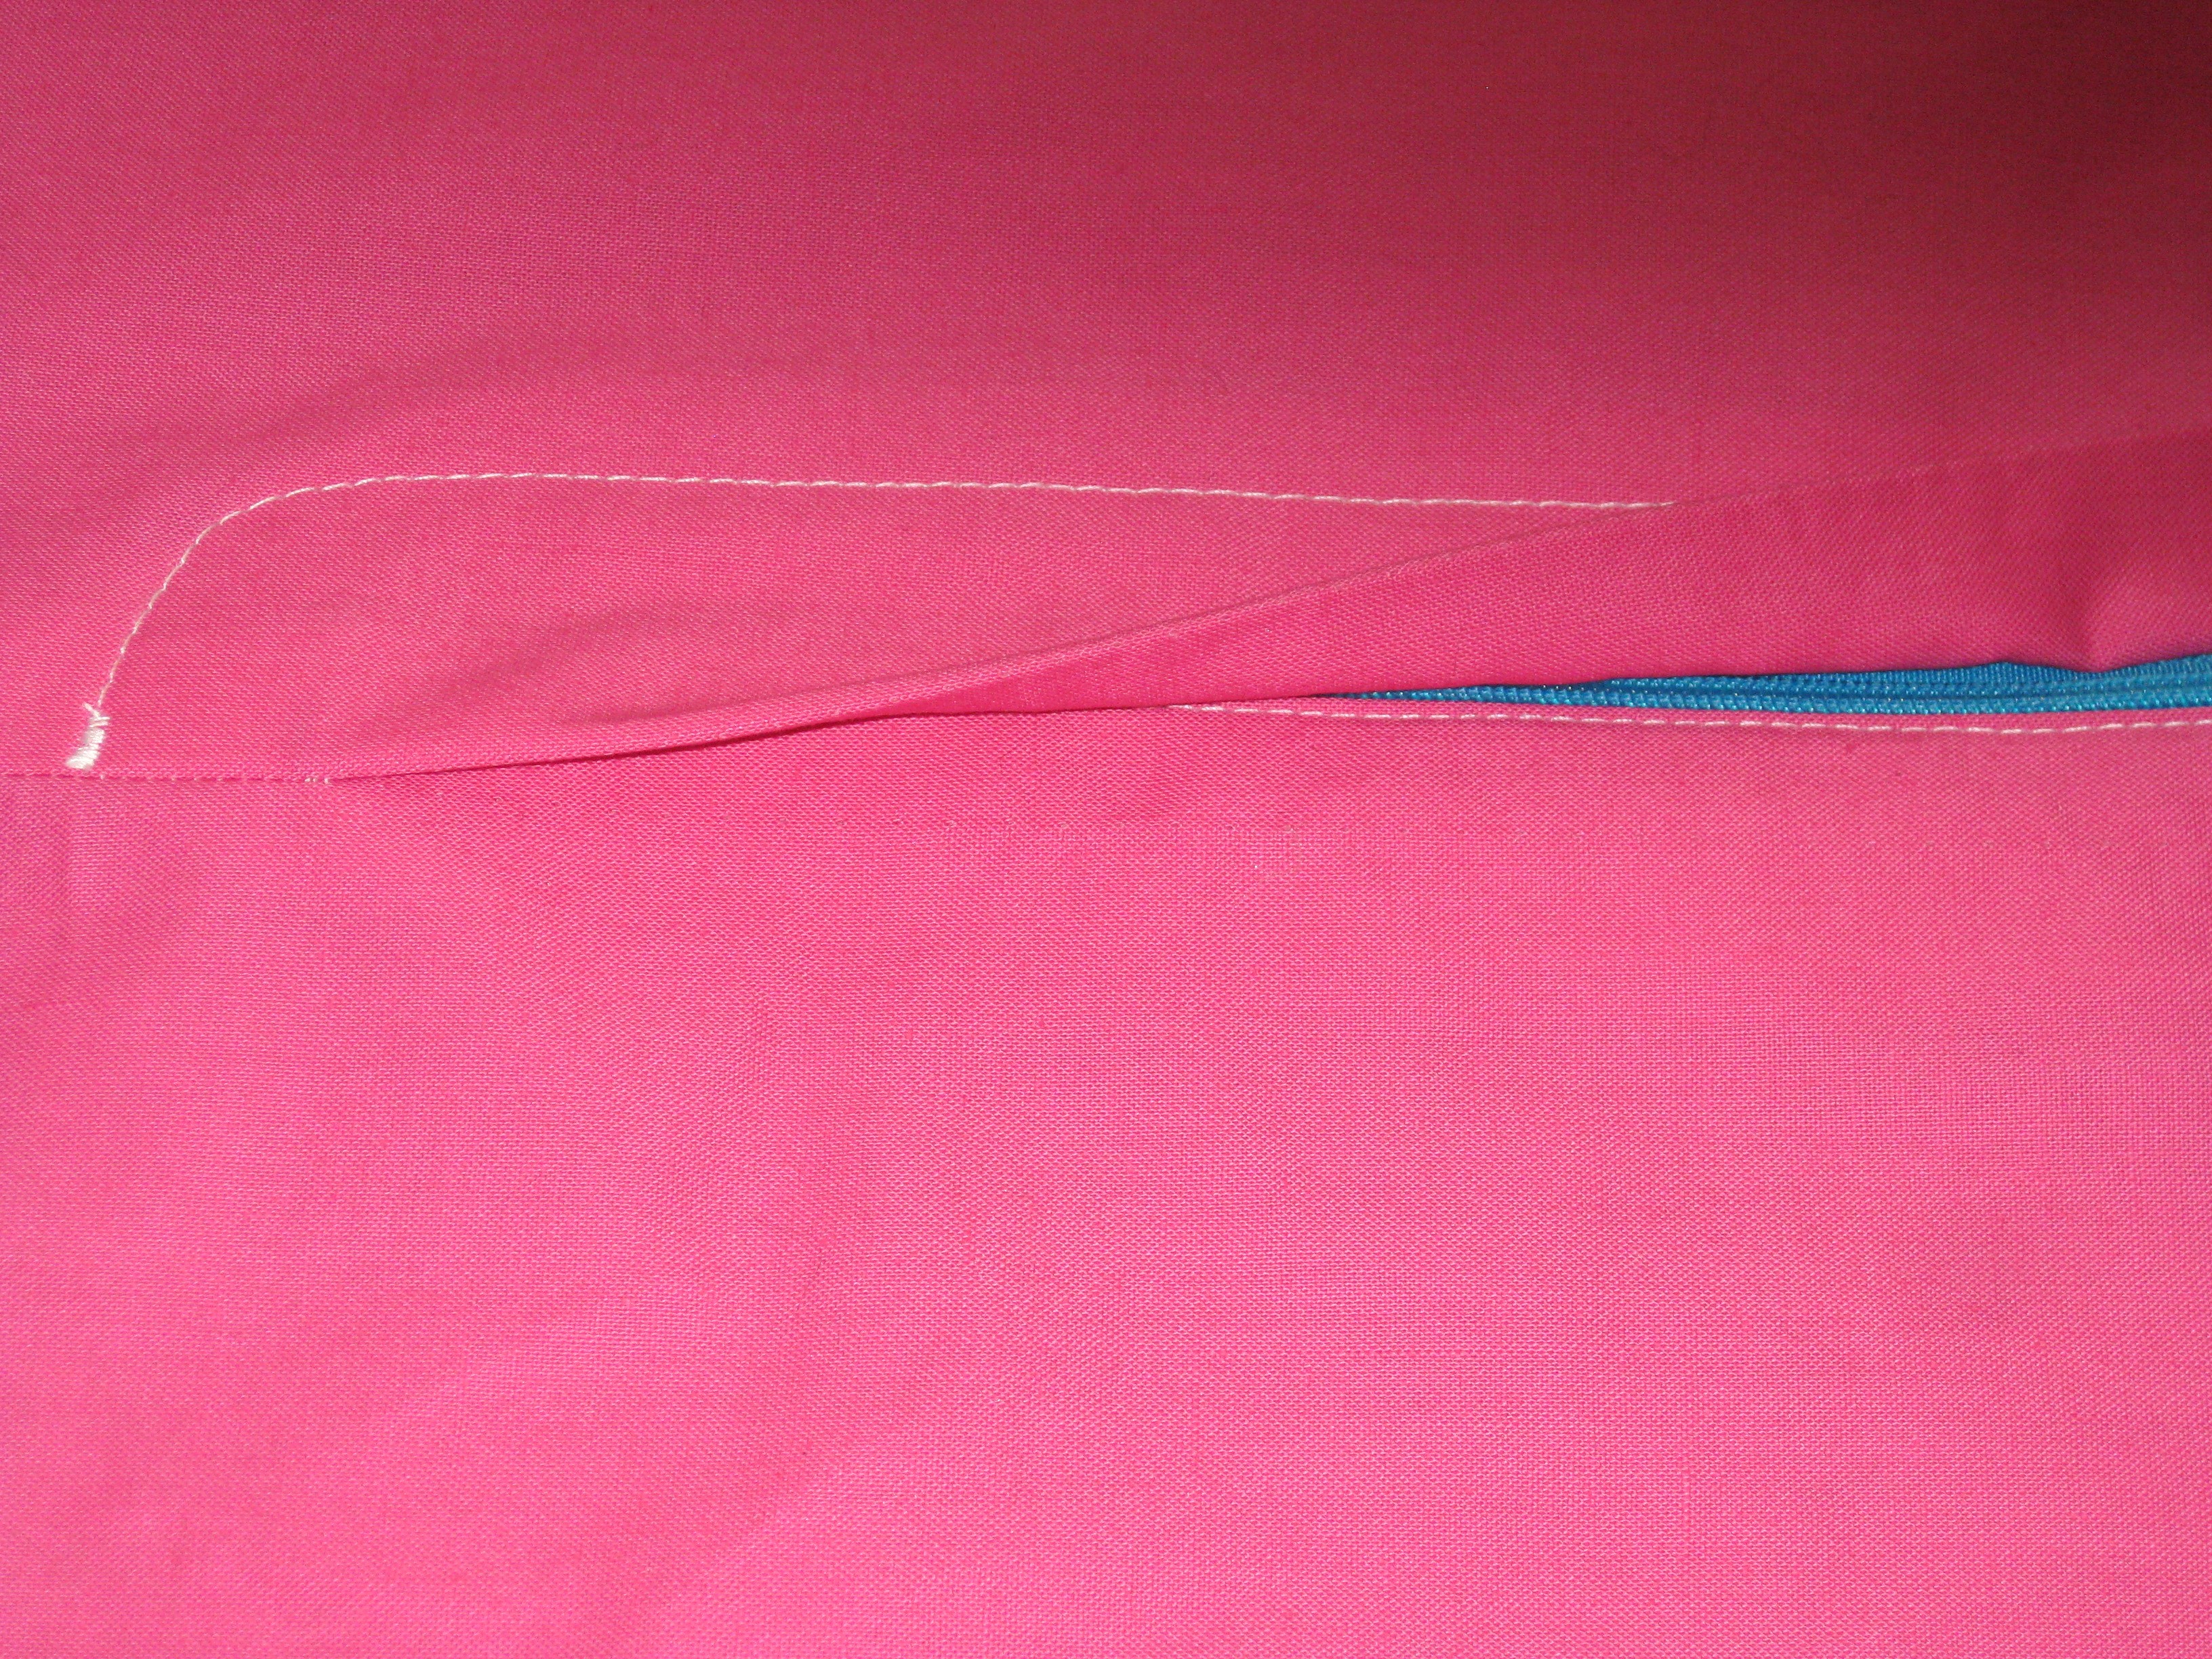
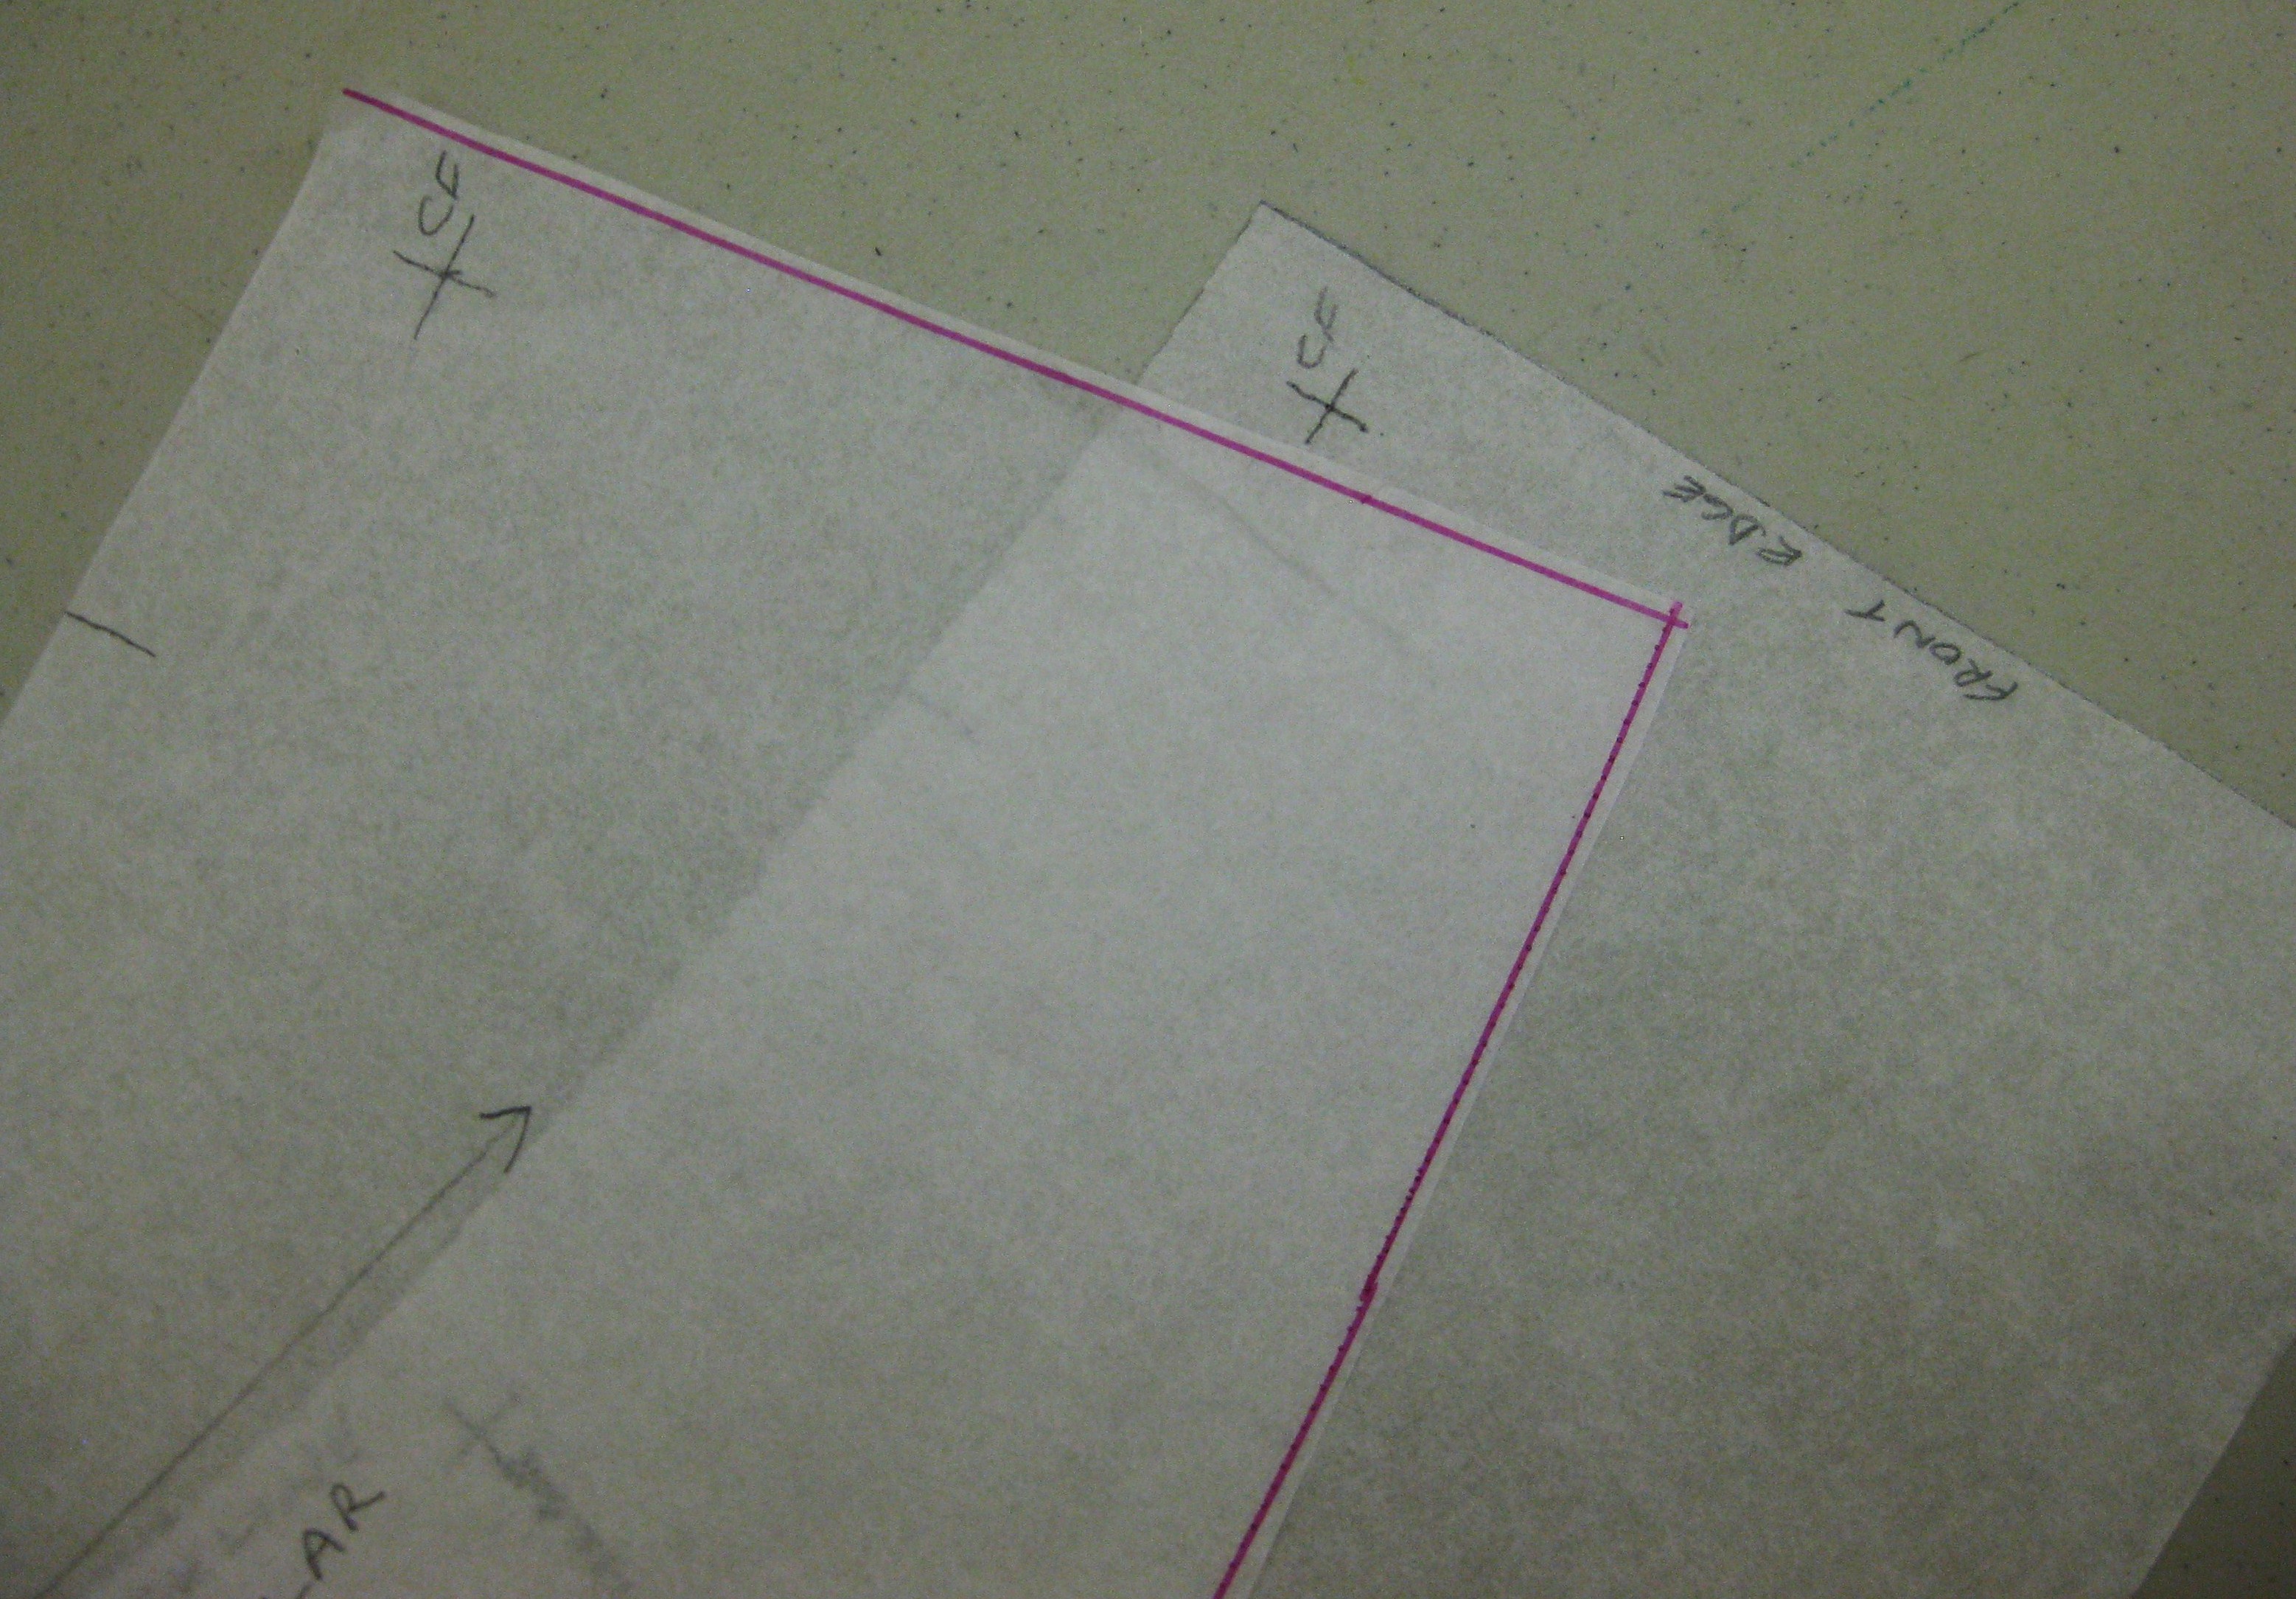
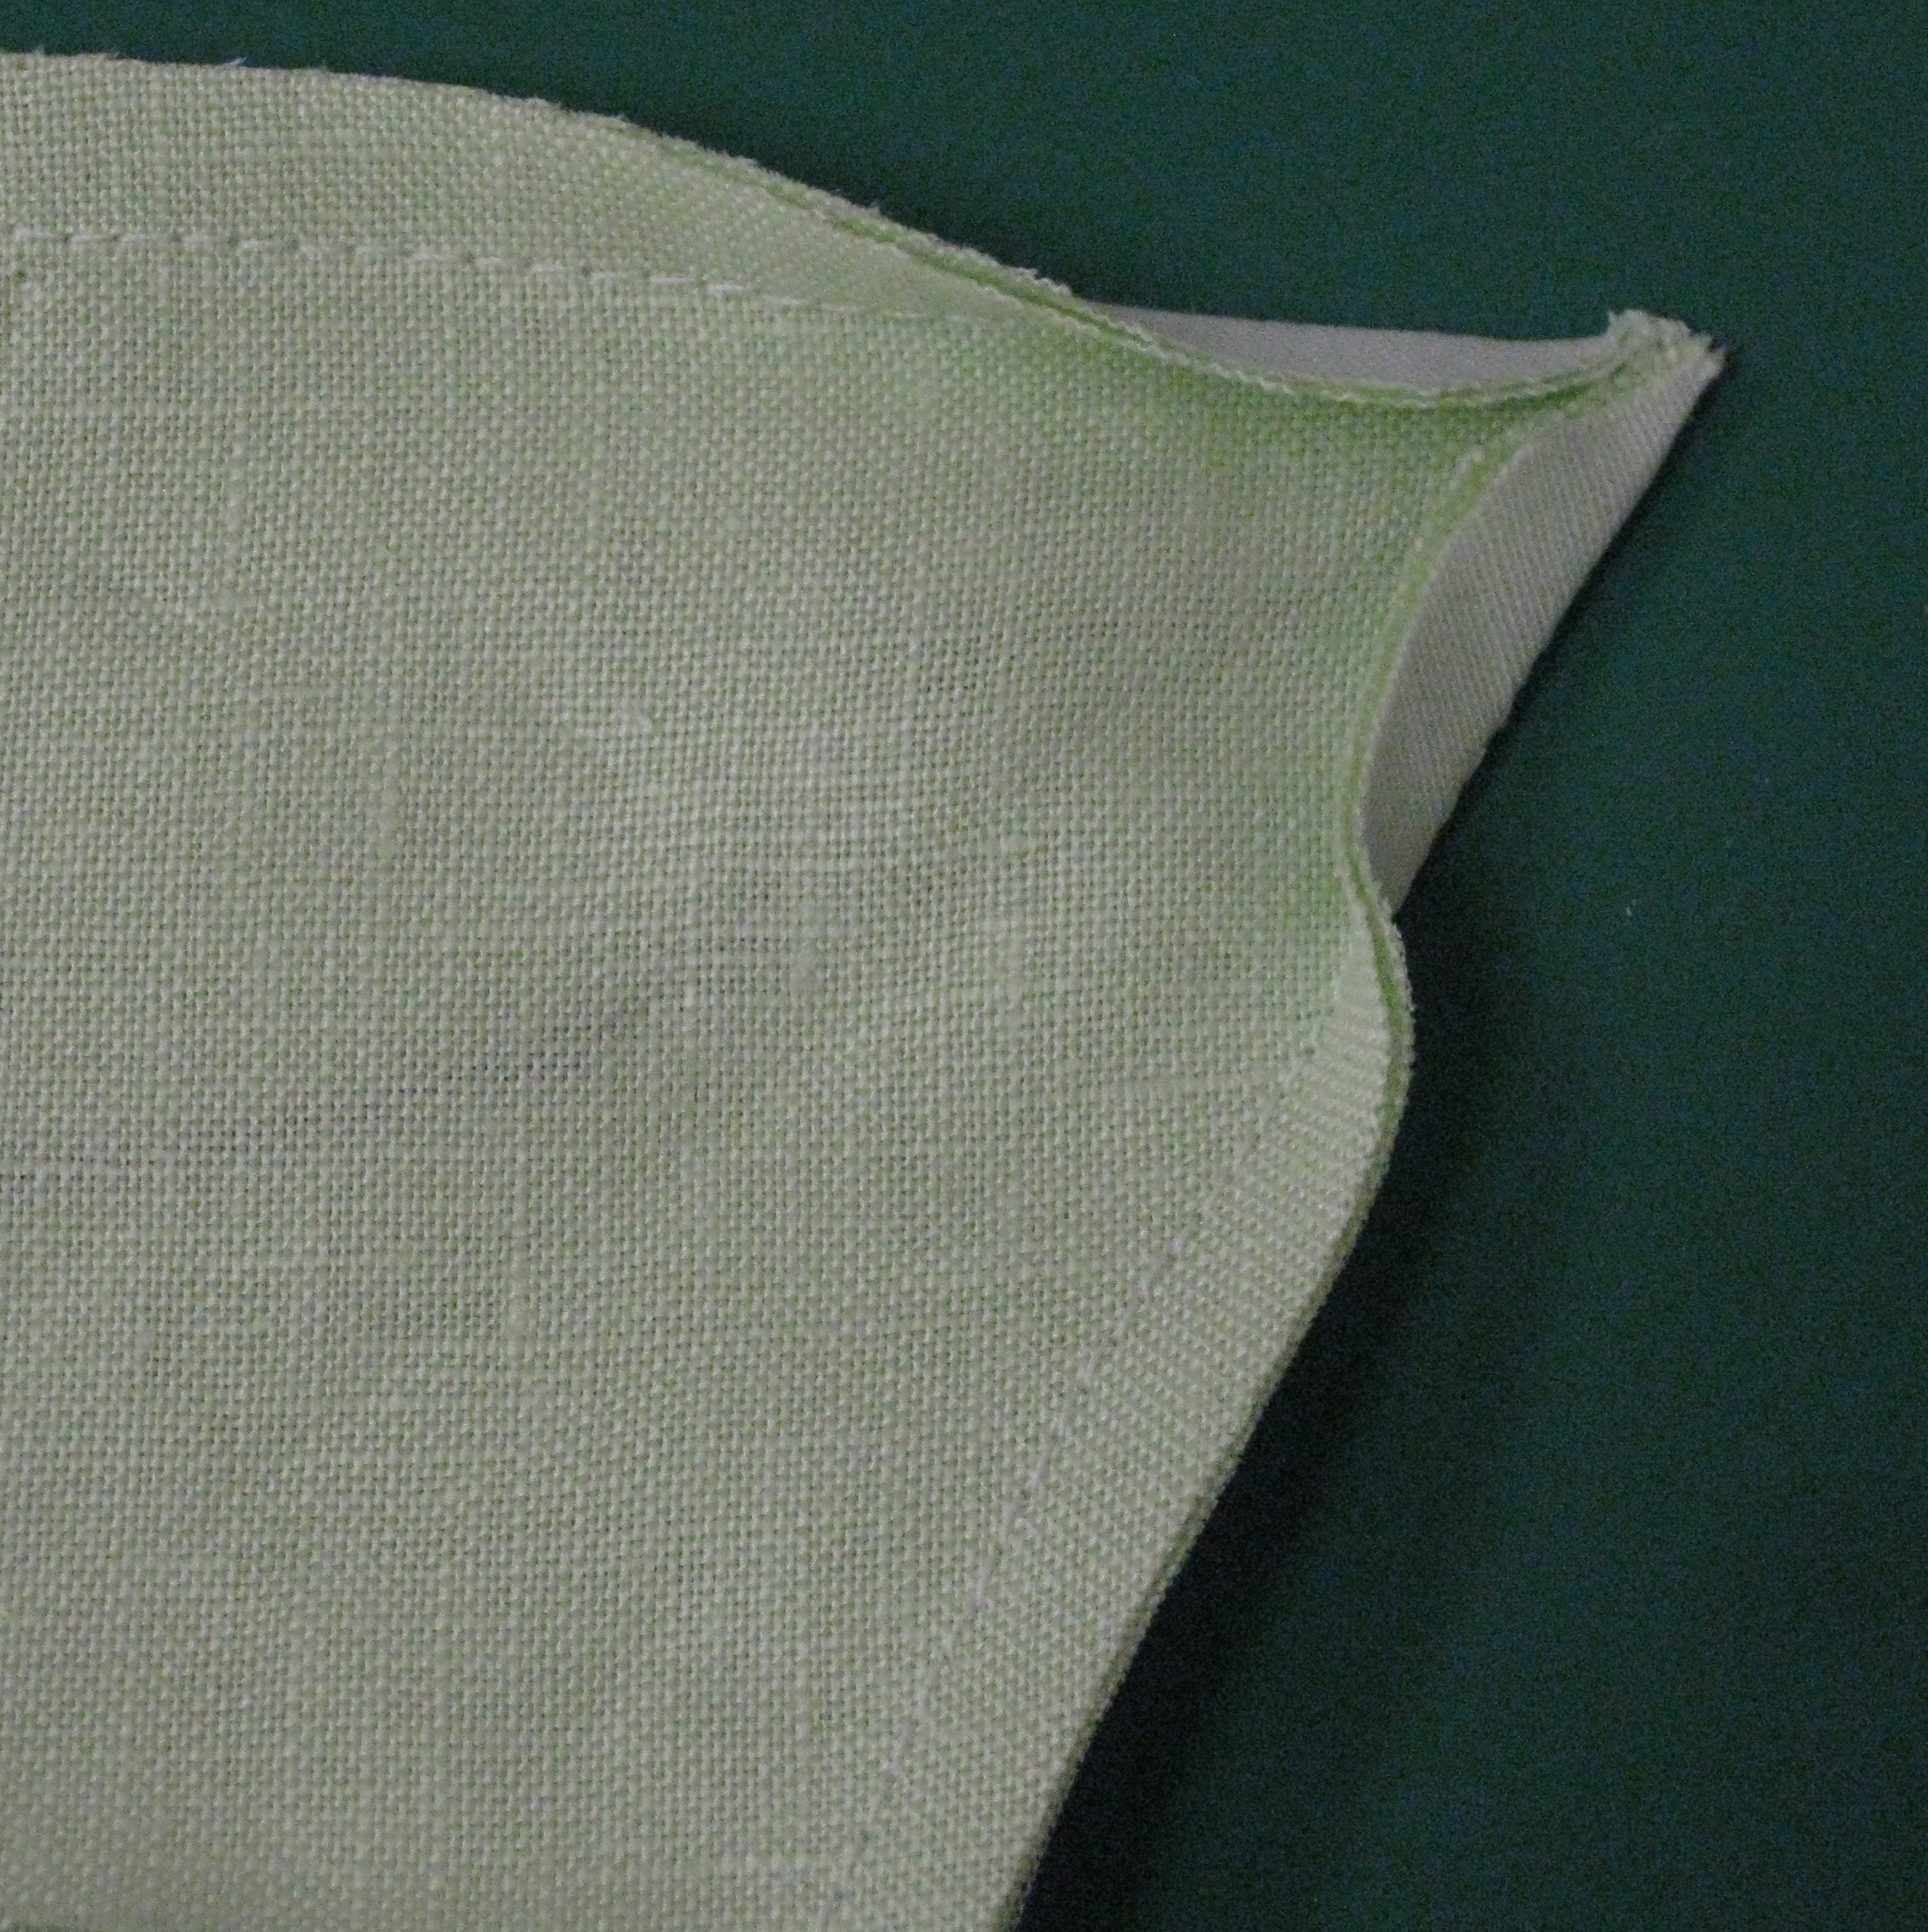
After marking the new shoulder line on the front bodice, trace the same new shoulder line on to the back bodice pattern.

You might think, “What difference does a couple of degrees make?”  Correcting this first means that often more complicated and unnecessary alterations are not required.  Yes, it will decrease the armscye circumference and raise the underarm but these can be easily changed if such an alteration is needed.

Having the shoulder seam placed correctly can reduce (and sometimes eliminate) the amount needed for a full bust adjustment.  This is a good by-product of the shoulder angle adjustment.  If the amount needed for the full bust adjustment is reduced, it helps to avoid a lot of distortion caused by large darts.

Once the shoulder length and level has been established and marked on the pattern, the following points are checked, first on the front and then on the back:

Front Check Points:

IMG_3859

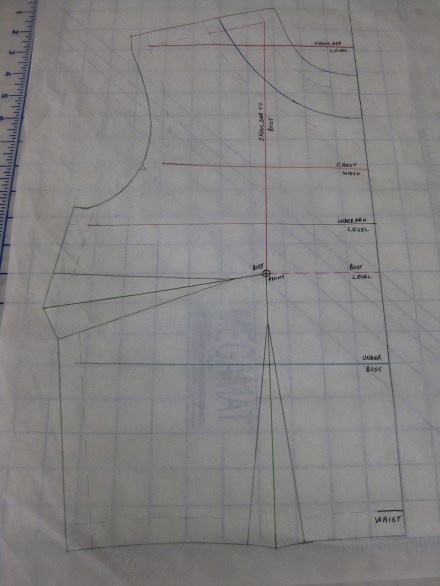
Front bodice with seam lines added and showing horizontal reference lines and vertical measurement points.

  • Shoulder to shoulder:
    •  extend the centre front up beyond the neckline point
    • measure from where the shoulder seam meets the armhole seam and across to the centre front line
    • multiply this by two to find the whole measurement
IMG_3860

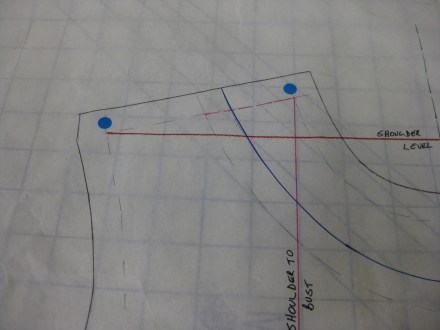
Shoulder to shoulder from end of shoulder to centre front – multiply measurement by 2 for total width.

  • Chest Width:
    • measure from seam line just above the notch at the armhole to the centre front
    • multiply this by two to find the whole measurement
IMG_3866

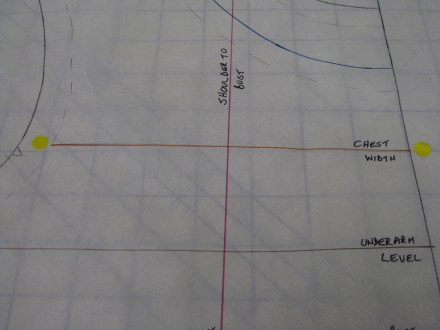
Chest width from arm hole to centre front – usually 10-15cm (4″ – 6″) down from shoulder point.

  • Shoulder to bust point:
    • measure from the base of the neck stem where it meets the shoulder to the level of the fullest part of the bust
    • many patterns mark the bust point however, if this is missing, draw through the centre of the bust dart (and under bust dart if there is one) to a point approximately 2.5-3cm / 1″- 1 1/2″ beyond the point and use this as the measuring point (most commercial patterns position the bust point approximately 5cm /2″ below the level of the underarm seam)
IMG_3884

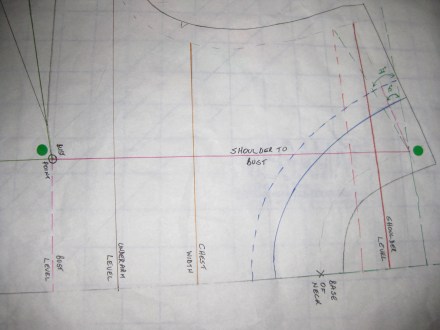
Highest shoulder point to bust point.

  • Bust separation:
    • this is the distance between the fullest point of the breasts
    • divide the amount by 2 and mark the point in from the centre front line
  • Bust point to under bust:
    • taken from the centre of the bust at the fullest part to level with the chest under the bust (usually at the bottom of the bra underwire)
IMG_3885

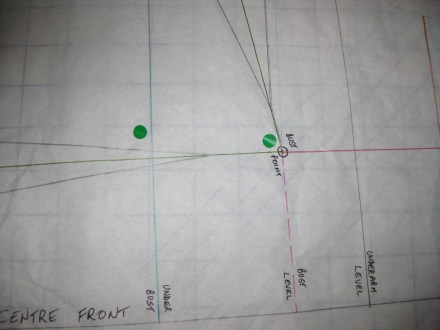
Bust point to under bust – straight measurement down from centre of bust to the level of bra underwire.

  • Under bust to waist:
    • from the base of the bra to the waist (at the bottom of the elastic around the natural waist)
IMG_3886

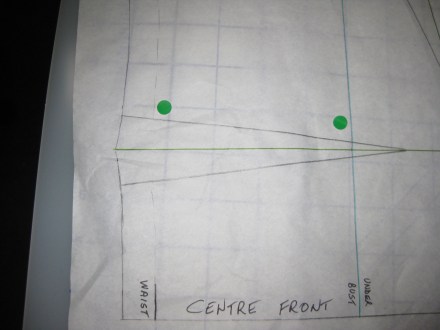
Under bust to waist measurement.

Back Check Points:

IMG_3881

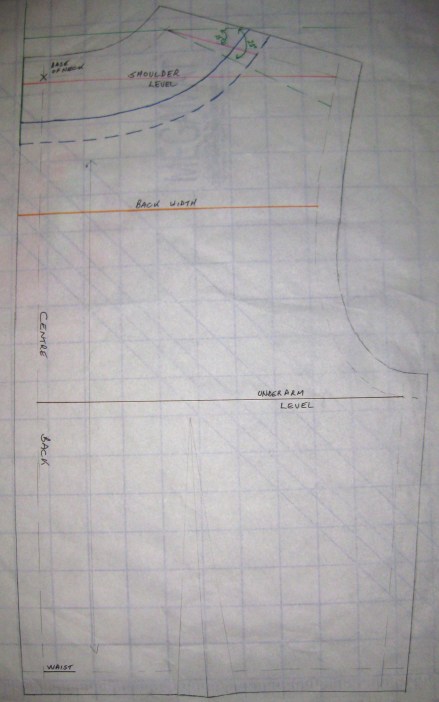
Bodice back with seam allowances and horizontal reference lines marked.

  • Back width:
    • measure from seam line just above the notch at the armhole to the centre back
    • multiply this by two to find the whole measurement
  • Shoulder to shoulder:
    •  extend the centre back up beyond the neckline point
    • measure from where the shoulder seam meets the armhole seam and across to the centre back line
    • multiply this by two to find the whole measurement
  • Back length:
    • measured from the nape of the neck (highest point of the spine) to the bottom of the elastic marking the natural waist

You will notice that, except for shoulder to shoulder lengths, chest and back widths and bust separation, the remainder of these measurements are vertical.

Completing vertical alterations first before horizontal adjustments are assessed is very important so that any additional width will be placed in the correct position on the pattern which will make the first check of the toile much more meaningful when  the need for any further changes is being assessed.

Since ease is very minimal at the shoulder to shoulder and chest width points these measurements provide an excellent guide when selecting which size pattern to use.

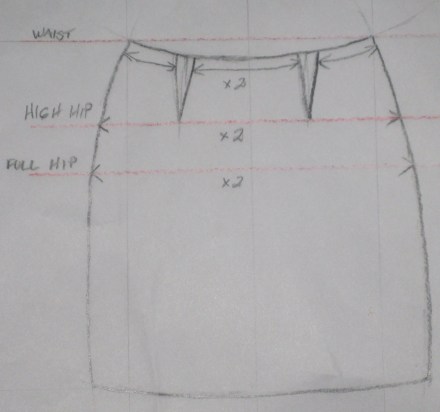
My next blog will cover the method for comparing body measurements to a skirt pattern.


Ease and Pattern Sizing

About a month ago I came across a blog post from McCall’s Patterns which included a discussion about the confusion expressed by their customers about size selection when they are buying patterns versus ready to wear.  There was much discussion about whether the pattern companies should align their sizing with ready to wear to avoid confusion when selecting the right pattern size (???)

As most people would be aware, there are no sizing standards in ready to wear clothing in Australia (or elsewhere I suspect).  Even if the industry is using standardised slopers/blocks, the preferences for grading between sizes and ease vary widely from brand to brand (which is why when we find a brand that “fits” we usually stick to it).

The subject of pattern sizing comes up with all students sewing their own garments – “What size do I buy?”, “I can’t be a 12 – I only buy size 6 in tops!”, “I buy the right size pattern but they are always too big when I make them up.”

Most of these issues can be addressed by gaining an understanding of ease.  There are two types of ease.  The first is wearing ease which is added to the basic body measurements so that the wearer can move and breathe in a very fitted garment.  This is the base from which all designs are then developed.

The second type of ease is called design or fashion ease.  The amounts used are at the discretion of the designer or pattern company to achieve the “look” they want or that fashion demands.

Another consideration is the fact that garment styles (including design ease) change over time:

  • tiny waists and full skirts of Dior’s “new look” in the 50’s
  • short, minimally shaped garments of the “mod” era in the 60’s
  • loose fitting, flowing styles of the “boho” era in the 70’s
  • over the top closely fitted garments with wide shoulders and deep armholes in the bling of the 80’s
  • pared back more structurally “simple” and oversized styles in the 90’s
  • the active wear as day wear styles of the early 2000’s
  • spandex in everything and close fitting styles of today

Through all of this fashion change, body shapes have evolved as well.  A lot of young women are much taller than those of us born in the 1940’s-50’s.  Women’s lifestyles have also changed enormously. There is much more focus on exercise as well as many more sedentary jobs and leisure pursuits.

Unfortunately today we live in era of mass production and the demand for ever cheaper clothing.  Most people are not aware of how wonderfully comfortable it feels to wear a custom made to measure garment compared to “if it zips, it fits” – no matter what the price!

It is totally unrealistic to expect that patterns will fit each individual straight out of the envelope.  The cost alone would be prohibitive and this has been the case since paper patterns were introduced for the home sewer in the late 1900’s.

The crux of the matter is whether our own individual body measurements coupled with our preferences regarding the amount of ease we are comfortable wearing matches the finished sizing of the garment (or indeed commercial pattern).

Major factors affecting the fit of garments are skeletal frame and body posture, often to a far greater degree than body size.

So where does this leave us as sewers?

We have the ability to take the elements of the current fashion and incorporate them into stylish, comfortable garments which flatter and are made to fit our own individual body shape and proportions.

It does not matter what size or shape we are, by accepting what is (we cannot change our skeletal frame!) and making friends with the tape measure, we can learn to adjust commercial patterns for our own individual requirements.

My post on 20th July, 2015 covered how and where to measure the body; selecting the best pattern size; the order of making pattern alterations and the vital importance of making a trial garment (called a toile or muslin).Body Measurements

In this post, I will discuss how to prepare a commercial pattern to assess what initial changes can be made before cutting the toile.

Additional Body Measurements:

When taking measurements, wear the undergarments you intend to wear with the finished garment and a close fitting garment (leotard) if desired.  Also wear the type of shoes you will wear with the finished garment.  The height of the heel affects the spinal alignment and posture.

To assist when taking these measurements, mark the true waist with tape or elastic tied into position – ensure that it is parallel to the floor all round the body.  (This position may not be where you want the top of pants or a skirt but it is an absolutely vital reference point for alterations.)

Also use sticky dots to mark the position of each side seam level with the full bust, waist, and high and low hip positions.  Be sure to keep the alignment of the side seam perpendicular to the floor.

As well as the usual circumference measurements (bust, waist, hips, etc), there are additional horizontal measurements which will greatly help flat pattern alteration:

  • shoulder length (from base of neck to directly up from arm crease)
  • angle of shoulder slope/shoulder depth (align a square with the base of the neck and measure depth below that squared point)
  • shoulder to shoulder – front and back (shoulder bone to shoulder bone)
  • cross chest width (where the arm joins the body)
  • cross back width (where the arm joins the body
  • front and back waist from side seam to side seam
  • front and back high hip and low hip from side seam to side seam

Front vertical measurements are taken from:

  • depth of cross chest position – high neck point (where neck meets shoulder) to cross chest (level with where arm joins body)
  • depth of bust position – high neck point (where neck meets shoulder) to bust point
  • depth of under bust – from bust point to bottom edge of bra cup
  • midriff – from bottom edge of bra cup to waist
  • depth of high hip along the side seam – from bottom edge of waist tape to high hip position
  • depth of low hip along the side seam – from bottom edge of waist tape to low hip position crotch depth (tie a cord or shin elastic around thigh at highest point and measure from bottom of waist tape to this position)
  • thigh depth from waist – on side seam position
  • knee depth from waist – on side seam position
  • calf depth from waist – on side seam position
  • ankle depth from waist – on side seam position

Additional back vertical measurements are:

  • length of upper back – from nape of neck to cross back position (level with where arm joins body)

Marking the Pattern:

To preserve the original pattern, it is a good idea to trace each pattern piece, (complete with all markings, grain line and seam lines) on to grease proof paper or your preferred pattern making paper.

On both front and back bodice, skirt or pant pieces, use a coloured pencil and markers to draw in horizontal lines relating to the position that body measurements are taken.  All lines need to be at right angles (perpendicular) to the grain line on the pattern pieces.

Bodice

Torso reference points

Skirt

Skirt reference points.

Sleeve

Sleeve reference points.

Pants

Pants reference points.

In my next post I will discuss how to compare your measurements to the pattern measurements as well as how and where to make alterations so that, when you try on the toile, you will have the pattern shaping in the correct position and enough width to start with.  Even though minor adjustments may still be needed, the fitting process will be simpler.


A Good, Clean Cut

There are two things that make a huge difference to the success and appearance of a finished project – careful pressing and the removal of bulk.

Accurate cutting is the foundation of every garment; not only is the importance of accuracy with the initial cutting of the fabric critical to a good result, but also during construction when clipping, trimming and grading to reduce bulk.

Using the best tool for each cutting task makes it much easier to cut and trim accurately; rip and remove wrong stitching and remove temporary threads without damaging precious fabric.

These are my favourite fabric and thread cutting tools:

  • Long blade paper scissors – short blades can tend to chop the pattern tissue
  • Shorter blade household scissors to cut boning, millinery wire, etc
  • Soft Canary 210cm dressmaking shears – they are light and easy to handle with arthritic hands and they cut like a hot knife through butter!
  • Soft Canary 230cm serrated blade dressmaking shears – the serrated blade keeps slithery fabric in place resulting in nice clean cuts rather than ragged edges which make construction inaccurate and difficult

    Paper scissors and Soft Canary Dressmaking Shears and Serrated Shears

    Paper scissors and Soft Canary Dressmaking Shears and Serrated Shears

  • Soft Canary pinking shears – an oldie but a goodie! Sometimes any additional treatment to a seam edge can eventually show through to the right side of the garment.  These little bias cuts prevent further fraying of the fabric and keep the cut edges soft and light.

    Soft Canary pinking shears - use when a smooth finish is needed

    Soft Canary pinking shears – use when a smooth finish is needed

  • Gingher 5” Craft scissors (Tailor’s Points) – I could not do without these. I discovered them when watching a Kenneth D King DVD from Taunton Press.  They have one knife edge blade and one bevelled edge blade and a very strong spine which makes them perfect for precious cutting and trimming, even on very thick fabrics

    Gingher Tailor's Points - my very favourite - wonderful for clipping, trimming and grading - very sharp right to the point and very strong.

    Gingher Tailor’s Points – my very favourite – wonderful for clipping, trimming and grading – very sharp right to the point and very strong.

  • Gingher thead snips – I resisted thread snips for a long time until I found these. By placing the opening over my middle finger I achieve excellent control, especially when trying to clip elusive thread tails
    Gingher thread snips - very strong and sharp

    Gingher thread snips – very strong and sharp

    Control thread snips by placing finger through opening.

    Control thread snips by placing finger through opening.

  • Gingher appliqué scissors (Duckbills) – very useful when doing heirloom sewing, these very versatile scissors are excellent for grading and when it is necessary to trim close to an edge on one layer without cutting the under layer – great for machine rolled hems
  • Havel’s lace scissors – these tiny gems are excellent when working on hand application of delicate laces

    Gingher Duckbill applique scissors and Havel's lace scissors

    Gingher Duckbill applique scissors and Havel’s lace scissors

  • Buttonhole chisel and wood block – mine are over 40 years old and have successfully cut lots and lots of buttonholes without ever needing to be sharpened – a wonderful clean, on grain cut stops thread pulls during wear and care of the garment

    Buttonhole chisel and wood block for great clean and accurate cuts

    Buttonhole chisel and wood block for great clean and accurate cuts

  • Rotary cutters – 45mm and 18mm blade – I have always used these wonderful cutters top cut straight waistbands, buttonhole lips, pocket flaps and bias strips. The smaller blade is excellent and more accurate for cutting curved edges.
    45mm and 18mm rotary cutters - smaller blade great for cutting around curves

    45mm and 18mm rotary cutters – smaller blade great for cutting around curves

    Perhaps if my arthritis worsens, I will try cutting out my fabrics as I know there are many sewists who swear by this method.  I will need to practice first I think as it can sometimes be difficult to change the habits of a lifetime of sewing.

Another important cutting task is the dreaded unpicking.  Using patience and the right tools for the job can make this inevitable task much less stressful (on the sewist and the fabric!).

These are my favouring “unstitching” tools:

  • Gingher seam ripper with retractable blade – super sharp but with safety device built in – using this tool requires a light hand and the patience to cut a little at a time from the reverse side of the fabric – wonderful for removing a buttonhole which is not in the right place (BEFORE it is cut!!!)
    Gingher Retractable Seam Ripper and Unpicker with thread remover on top of lid

    Gingher Retractable Seam Ripper and Unpicker with thread remover on top of lid

    A buttonhole mess - gently and slowly pass the blade over the underside of the stitching

    A buttonhole mess – gently and slowly pass the blade over the underside of the stitching.  I place my wooden block underneath so there are no accidents!

    Turn work to right side and gently release the thread which was cut away underneath; remove remaining fluff with thread eraser.

    Turn work to right side and gently release the thread which was cut away underneath; remove remaining fluff with thread remover.

  • Unpicker – a good size handle grip which fills your hand together with the “red dot” is an invaluable tool.
    The way most sewists were taught to use an unpicker - slide the blade under and break the stitches.

    The way most sewists were taught to use an unpicker – slide the blade under and break the stitches.

    Third hand bird and clamp

    Third hand bird and clamp

    Clamp fabric and pull the seam to be unpicked until it is taut

    Clamp fabric and pull the seam to be unpicked until it is taut

    Insert red ball on the end of the unpicker between the stitches and push forward to open the seam.

    Insert red ball on the end of the unpicker between the stitches and push forward to open the seam.

    Seam opens ahead of the unpicker.

    Seam opens ahead of the unpicker.

    Because these tools are used regularly by most sewists, they can become really blunt so treating yourself to a new one every few months will save strain on your fabric and sanity

  • Thread tweezers for removing those pesky threads which are difficult to remove once the ripping is finished

    Clover thread tweezers - a new acquisition and they are superb!

    Clover thread tweezers – a new acquisition and they are superb!

  • Thread eraser or masking tape – these are excellent for cleaning up fluff and stray bits of thread after unpicking

As with all of our precious tools, care and maintenance is paramount to ensure their long and useful life.

  • Prevention is better than cure so be careful not to drop your scissors on to a hard surface; do not expose them to moisture and do not try to cut other than fabric with your fabric scissors. The occasional use of fine tissue paper to aid with cutting slippery and fine fabrics will not usually cause a problem.  Cardboard, boning, plastic etc is another story!
  • A lot of fluff occurs when fabric is cut and sewn so lightly polishing your tools with a soft cloth after each session is very beneficial.
  • A tiny drop of light machine oil where scissor blade join can keep them from becoming stiff – be sure to wipe them afterwards and cut through some scrap fabric to be sure no residual oil will mar a future project
  • Should you have a small burr from the accidental striking of a pin, a gentle rut with fine grade sandpaper can provide a temporary fix
  • Scissor sharpener to remove burrs

I am often asked about having scissors sharpened and I have to say that finding someone to do this has become harder over the years.  I usually suggest enquiring where quality knives are sold.  However, with diligent home maintenance and having a few pairs of scissors to rotate, I usually don’t have any problems.

Anyway, because I love scissors, an excuse to replace a pair would not necessary be a bad thing!

Some Thoughts On Fabric Layout and Construction Order

Do we really need to follow the fabric layout and construction order in the pattern guide sheet?

All patterns (except for Marfy designs) come with a guide sheet offering a suggested fabric layout and instructions to guide sewers through the construction process.   While it is wise to study the information to identify all the pattern pieces and how they fit together, the layout and order of construction can often be changed for more efficient use of your sewing time and easier handling of your fabric.

Fabric Layout:

Before deciding what fabric layout will work best for your project, consideration of a number of aspects the fabric being used is vital:

  • Do you have sufficient yardage and is the fabric wide enough? This is especially important if the pattern has been altered for fit.  The fabric yardage required can also be affected if wider seam allowances and hem allowances are needed.  Wider seam allowances can be required if fabric is likely to fray easily.
  • Does the fabric have a nap or one way pattern? If not, the layout may be changed so less fabric is needed.  Facings and bindings may be able to be cut from a similar weight but different fabric as they will be on the inside of the garment.
  • Similarly, does the fabric have a pattern or weave which needs to be matched? Many patterns state that they are not suitable for one-way designs; however, it can still possible to use such a fabric provided extra yardage is available.  Using a single layer layout is really the best way to maximise success when matching prints and patterns.

Preparation of Garment Sections and Interfacing:

  • Will the fabric be easy to work with? If it is likely to fray easily, fusing the edges of each piece with a thin strip of fusible interfacing may be necessary so this does not occur.  With very loose weave fabrics, overlocking the edges is often insufficient and the stitching can actually fray away with the fabric.
  • Does the fabric have enough body to support various elements? Different areas of the garment will often need different types of interfacing and the instructions suggest the very bare minimum of interfacing as a guide only.

Construction Issues:  

  • Does the garment contain construction elements which you have not attempted before? Even if you have had experience with the included techniques on other garments, it is really worthwhile to practice on scraps of the fabric before tackling the actual garment.
  • Is the fabric easy to press? If not, pressing each seam/detail as you go is doubly important so that when the garment is finished, a light steam may be all that is necessary.
  • Does the fabric mark easily when being pressed? Testing how the fabric behaves when seams, hems, etc are pressed is important so that a more appropriate technique can be chosen if any problems are highlighted.
  • When sewing garments in smaller sizes, it is often much easier to change the order of assembly to minimise the wear on the fabric if it has to be manipulated in a small space. For a waisted dress, or a garment with a band joining separate pieces, these elements should be constructed for the front and back and the zipper installed before side seams are joined.  Simply leave the last 5cm/2″ of each horizontal seam unstitched until the zipper is in place.  Vertical seams can be sewn and pressed and the remaining horizontal seams finished as mentioned in the guide sheet.
  • If any elements are repeated or mirror imaged, complete them in tandem. This is particularly important with welt pockets, bound buttonholes, patch pockets, etc. so that they will be the same size and be positioned properly.
  • Check that buttonhole positions are going to suit the body of the wearer and change them as needed.

Regardless of whether changes are made, I find I get the best results if I always:

  • endeavour to be as accurate as I can at each step of the process
  • read the guidelines a couple of times before making any changes to be sure I am making good decisions
  • use a ruler during the layout phase and be doubly sure that all grain lines are accurate along the whole length of every pattern piece
  • transfer all pattern markings, not forgetting centre front and centre back
  • stay stitch outer edges
  • stitch and press directionally
  • use a press cloth
  • press every seam as sewn, open and to suit my seaming method prior to any piece being joined to another
  • work on like tasks in batches – sew all the darts, stitch all easing lines, press as required
  • complete at the same time all elements which must match.

I hope this information is helpful as you start your summer projects.

The Importance of Inner Structure Part 1

Fabric is a fluid medium.  It will move and drape according to its thickness and weight.

The outer appearance of any garment is greatly affected by the care taken to provide the correct inner structure for the fabric and style of the garment.

There are many choices to be made.  Hopefully, this information will help in evaluating the desired effect for each garment and in making your decision on what will work best for your project.

Interfacing:

  • Interfacing is the most commonly used method of providing support to the outer edges of a garment
  • The purpose of interfacing to support the style and enable the garment to keep its shape during wear, increasing its longevity and resilience during and after wear
  • Always found in applied neckline and armhole facings and as otherwise indicated in the guide sheet but its use can be extended to other areas of the garment
  • Interfacing fall into two groups – fusible and non-fusible
  • Both groups also can also be either woven or knit fabric types and both types have fabric grain which needs to be used in a similar way to the fashion fabric
  • Most commonly, fusible interfacings are used and they come in different weights to suit different fabrics and garment styles
  • If a fabric is not suitable for fusible interfacing, the sew-in variety is used instead – cotton, organza, hair canvas – all of which can be either on the straight of grain or bias which results in a more fluid drape
  • Either type of interfacing is cut from the appropriate pattern pieces and either fused to the wrong side of the fabric or hand tacked to the wrong side of the fabric
  • When using sew in interfacing:
    • Cut interfacing on the same grain as the fashion fabric and slightly smaller than each pattern piece being used
    • Place the interfacing on the wrong side of the fashion fabric and hand tack close to the seam line, just within the seam allowance
    • Once seams are sewn or edges taped, cut excess interfacing away from within the seam allowance
    • Cut out shape of darts to avoid build up of excess in the dart stitching line – darts are usually slashed open and attached to the interfacing by hand using a catch stitch
    • Pad stitch to attach the interfacing to the fabric – heavier padstitching can be used to add extra stiffness where required (see blog post 21st June, 2015)
  • To achieve the correct adhesion of fusible interfacing, you need to:
    • Warm up the fabric by ironing the wrong side of the garment piece to be interfaced
    • Place the glue (rough) side of the interfacing on the wrong side of the fabric
    • Cover with a press cloth
    • Using a steam iron and a lift and press motion, move over the piece leaving the iron in place for 10 seconds each time – also press firmly on the iron to ensure it fuses properlyIf you do not have a good steam iron, use a spray bottle to moisten (not wet) the press cloth and press until the cloth is dry
    • Turn the piece over, cover with cloth, and press again from the right side of the fabric
    • Once the piece is fused, allow it to lie flat to cool and then trim away any little pieces of interfacing that extend beyond the fabric edge
    • Whichever type of interfacing is used, replace the pattern tissue on the garment piece to check that it has not distorted;  trim any excess interfacing
    • Marking is done on the interfacing
  • Fusible interfacing can also be used to support a fabric which on its own would not have enough body for the chosen style
  • Extra fusible interfacing can be applied in areas of the garment which may need extra support, for example a lapel collar or unusually shaped collar, hem or sleeve hem
  • If a more subtle and soft drape is desired, interfacing can be cut on the bias grain
  • Calico is often used in top areas of heavy jackets and coats for sleeve cap and underarm supports, chest pieces and saddle backs because that is the area of the garment which takes the whole weight of the garment during both wear and storage

Machine Stitching:

  • Rows of machine stitching will also stiffen fabric and can be used on under collars in place of hand pad stitching sew in interfacing.

Underlining:

  • The purpose of underlining is:
    • to provide shape and strength for the outer fabric where the fabric is delicate or unable to be fused, for example fine silks, satin, velvet, bouclé and fabrics with an embossed surface
    • to hide any trace of inner construction details on white or light coloured and shiny surface garments
    • to make an unlined garment more comfortable to wear
  • Fabrics which can be used for underlining include:
    • soft cotton flannelette (to create a little bit of loft and/or to add warmth) – be sure to prewash as flannelette shrinks considerably
    • silk organza
    • cotton batiste or lawn
    • cotton muslin
  • Underlining pieces are cut the same as the garment pieces and hand basted together just inside the seam line – they are then sewn as if they were one layer
  • Seam allowances, hems and other inner details can be stitched by hand to the underlining to keep them flat and in place

Interlining:

  • The purpose of interlining is:
    • to provide extra warmth to a garment, or
    • to add loft to otherwise flat surface/thin fabrics
  • Fabrics which work well include:
    • thin quilt wadding(batting) in either wool, cotton or bamboo, and
    • flanelette (be sure to wash it first in hot water to deal with initial shrinkage).

Inserting Zippers Part 4 – Fly Zipper

In this blog I will share the methods that I find work best for me.  I most commonly use the cut on fly to achieve a flatter finish over the tummy.

Fly zipper with cut on facing gives a flat finish with minimal bulk.

Fly zipper with cut on facing gives a flat finish with minimal bulk.

If I am making jeans, I use a much softer fabric for the fly and zipper shield.

Soft cotton used for fly facing.

Soft cotton used for fly facing.

Some of this information is contained in the guide sheet of patterns; however, to make installation easier and flow better, I have changed the order of some steps.

A fly zipper can be inserted to be opened from either the right hand or left hand side.  Traditionally women’s pants the zipper fly is placed on the right hand side and for men’s, on the left.

Ready-to-wear women’s jeans often have the zipper on the left hand side.

None of this really matters when we can sew our own clothes because we can choose whatever side we like!

Except for jeans, most commercial patterns for women’s pants are designed with a cut on fly and use a regular dress zip.  This technique minimises bulk on the front of the garment.

Many ready-to-wear garments are designed with a traditional separate fly facing which can be either made from lining or, in lightweight fabrics, from the same fabric as the pants.  Tailored pants usually have a regular dress zip.  Jeans most often have a metal zipper and zipper shield.

If you would like closer fit or wear your pants below the natural waist, the traditional fly with separate facing may give a closer fit – necessary with a lower waist position.

Pattern Work:

Add width to the centre front seam allowance where the zipper will be set.  I usually use 2cm/ ¾”.

To convert a commercial pattern with a cut on fly to a separate fly, changes will need to be made to the commercial pattern with the addition of a fly facing, zipper shield and extended waistband.

The centre front can be either of the straight of grain or slanted inward slightly.  The former allows for a little more tummy room.

If you would like to slant the seam, draw a line from the top of the seam (waist area) to the dot marking the lower end of the zipper.

To alter a pattern to accommodate cut on  fly, trace centre front and mark bottom of zipper.  Trace the  topstitching line and add a line ¼” beyond.   Flip this pattern piece over and align the centre front lines.  Mark the centre front fold line.

Draw desired width of fly extension and line up CF markings when adding this to the front of the pattern.

Draw desired width of fly extension and line up CF markings when adding this to the front of the pattern.

Use fly extension to make a pattern for separate fly facing which will be sewn at CF.

Use fly extension to make a pattern for separate fly facing which will be sewn at CF.

Interfacing:

Interface the fly facing and finish the outside edge.

Interface cut on fly facing and over CF on opposite side.

Interface cut on fly facing and over CF on opposite side.

For pants with a cut on facing, interface the underlap with the interfacing extending over the centre front seam on the side of the pants where the visible fly stitching will lie.

Preparing the Zipper:

Shorten the zipper if necessary.  For dress zips, use a longer zipper than the pattern requires.  Metal zippers should be as close to the correct length as possible.

If it is necessary to shorten a metal zip, do so by marking the desired length at the top of the zipper.  Carefully remove the metal stops (pointy pliers are good for this) and pull the unwanted teeth away from the tape.  When the required length is correct, replace the metal stops and pinch them firmly in place.

Make a template to assist with final topstitching of the zipper.

Zipper template is useful to accurately mark topstitching position.

Zipper template is useful to accurately mark topstitching position.

Insertion Technique – Cut on Fly:

Sew approximately 2”/5cm of crotch seam first – be sure to end exactly at the dot which marks the beginning of the zipper opening and back stitch to secure.

Stitch approximately 5cm (2

Stitch approximately 5cm (2″) of crotch seam, finishing at mark indicating bottom of the zipper – back stitch to secure.
Lengthen stitch to 4.0 and machine baste the remainder of CF seam.

Machine baste centre fronts together (SL4.0-5.0) in the area of the zipper opening;  press seam flat and then open.

Then press a fold on the underside seam allowance so the fold is flush with the cut edge of the fabric.

Press seam flat and open. Press a fold on the underside 15mm (5/8

Press seam flat and open. Press a fold on the underside 15mm (5/8″) from CF

Open the zipper and position the teeth of the zipper along this fold with the zipper stop at the bottom of the opening.

Position zip (coils up) under the folded back seam allowance - align the stop to the marked position.

Position zip (coils up) under the folded back seam allowance – align the stop to the marked position.

Using a zipper foot, edge stitch the zipper tape in place.

Using zipper foot, stitch on the seam allowance close to the zipper teeth and along the length of the zipper.

Using zipper foot, stitch on the seam allowance close to the zipper teeth and along the length of the zipper.

Close the zipper and place the garment right side down on a flat surface.  Allow the zipper to sit flat against the garment (right side down) and pin the other side of the tape to the cut on facing.  Stitch in place with the regular sewing foot.

Lay the work flat with wrong side of zipper uppermost.

Lay the work flat with wrong side of zipper uppermost.

Pin and stitch the other side of the zipper tape to the opposite seam allowance.

Pin and stitch the other side of the zipper tape to the opposite seam allowance.

Using a sliver of white soap or chalk marker and your template, mark stitching line on right hand side of front and topstitch from bottom of zip to top – bed the needle into the centre front seam line and walk the needle until past the metal stopper.

Turn work right side up and use template to chalk mark stitching line on front of garment.

Turn work right side up and use template to chalk mark stitching line on front of garment.

Stitch bar tack at bottom edge of zipper opening – bar tack is stitched with regular zigzag SW2.0, SL0.5 for about 1cm and centred over the zipper stitching.

Use a small zigzag to make a small bartack at CF at the base of the topstitching.

Use a small zigzag to make a small bartack at CF at the base of the topstitching.

Finished zipper installation with zipper hidden.

Finished zipper installation with zipper hidden.

Fly Zipper:

Press under 1cm/ ½” on the underside seam allowance.

Press under 1cm(1/2

Press under 1cm(1/2″) seam allowance above point where bottom of zipper will sit.

Make the fly protector by folding wrong sides together and overlocking the edges to close.

Stitch fly to centre front seam – working from bottom up – press seam flat, trim back by half and press seam open.

Fly stitched along CF seam - stop at mark indicating bottom of zipper.

Fly stitched along CF seam – stop at mark indicating bottom of zipper.

Fold fly to wrong side and edgestitch if desired.

Press fly to wrong side and understitch above marked point for bottom of zipper.

Press fly to wrong side and understitch above marked point for bottom of zipper.

Starting exactly at the dot which marks the beginning of the zipper opening sew approximately 5cm of crotch seam and back stitch to secure.

Stitch approximately 5cm(2

Stitch approximately 5cm(2″) of crotch seam – start exactly at bottom of fly seam.

Working with zipper teeth closed, place zipper tape under the fold and fly protector underneath –  using zipper foot stitch close to the zipper teeth from bottom to top through all layers.

Place right side of zipper against underlap fold - keep teeth close to zipper.

Place right side of zipper against underlap fold – keep teeth close to zipper.

Pin underlap on underside of zipper tape

Pin underlap on underside of zipper tape

Stitch in place from right side.

Stitch in place from right side.

Place garment on flat surface, wrong side up and fold the zipper shield out of the way.  Pin other side of the zip to the right hand side fly facing and stitch in place.

Position edge of fly with CF together over underlap.

Position edge of fly with CF together over underlap.

Pin underlap out of the way.

Pin underlap out of the way.

Stitch other side of zipper to fly facing.

Stitch other side of zipper to fly facing.

Using a sliver of plain soap or chalk marker, mark stitching line on right hand side of front.

Start fly stitching with small stitches (1.5) to add extra security.

Start fly stitching with small stitches (1.5) to add extra security.

Chalk marks can be easily removed using a clean eraser.

Chalk marks can be easily removed using a clean eraser.

Position the zipper shield in place.  Topstitch from bottom of zip to top through all layers – a cardboard template can be used to mark the stitching line.

Stitch bar tack at bottom edge of zipper opening– bar tack is stitched with regular zigzag (SW2.0, SL0.5) for about 1cm and centred over the zipper stitching.  Add an additional bartack to ensure zipper shield stays in place.

With fly facing in place underneath, stitch bar tack at bottom of zipper at CF and on curve of topstitching - to catch fly facing and keep in in place.

With fly facing in place underneath, stitch bar tack at bottom of zipper at CF and on curve of topstitching – to catch fly facing and keep in in place.

Underside showing secured fly facing.

Underside showing secured fly facing.

Finished zipper.

Finished zipper.


Waistband with Fly Zippers:

With a cut on fly, the waistband will extend from the centre front on the fly side to the edge of 3cm/1 ½” beyond the zipper teeth on the underside.IMG_2772

With a traditional fly, the waistband will extend on the left hand side so that it finishes flush with the zipper fly extension.  Pin in place and stitch using your desired method.IMG_2775

IMG_2782IMG_2774I usually either press under one side of the waistband or overlock/bind one long edge and stitch the garment side in place with the band on top so the action of the feed dogs will  ease the waist of the garment to the band.

Fold the waistband wrong sides together.  On either end stitch from the waist seam line towards the fold – do not stitch over folded fabric.

There is no need to clip across the corner of this seam unless you have a waistband with a seam on both sides.

Turn to right side, pin waistband in place and baste before stitching in the ditch or topstitching from the right side.IMG_2783IMG_2784

I hope you have found this blog helpful and would love to hear your feedback.

Next time I will cover exposed and separating zips.

A Great Method for Adding a Shirt Collar and Stand

I first used this method quite a few years ago after reading “Shirtmaking – Developing Skills for Fine Sewing”
by David Page Coffin Published The Taunton Press, Inc. 1998.   A variation of the method has also been featured a number of times in Australian Dressmaking with Stitches.

Collar on stand with neckline worn open.

Collar on stand with neckline worn open.

Previously I had used the methods shown in the pattern guidelines,  often with disappointing results – I could never seem to get the rounded ends of the collar stand exactly the same on both sides without lots of unpicking and resewing.

This method works very well with lightweight shirting fabrics and I have also used it on heavier jacket weight fabrics with good results.

To achieve a great shirt collar, there are a few things to consider:

  • Would you like a crisp or softer collar?
  • Will the collar band be worn mostly open or closed?
  • Do you want to wear the collar standing up at the back?
  • Is the fabric opaque or sheer/semi-sheer?
  • Does the fabric print need to be highlighted by using contrast details?

Preparation:

Working with smaller seam allowances makes the attachment of the collar stand and collar a lot easier to handle.  I normally use a seam allowance of 6mm to 1cm / ¼”- ½”.   After removing any excess seam allowance width from the collar, collar stand and neckline seams,  I cut out the upper and under collar and collar stand pieces.

So that the upper collar will roll out of the stand without showing any of the under collar, it is important that the upper and under collar are separate and different pattern pieces.  I have read many times that approximately 3mm / 1/8″ should be removed from the neck edge and ends of the under collar.  This can cause problems if the ends of the collar do not meet exactly where they are joined to the stand.

The pattern I have used is a KwikSew shirt pattern which uses 6mm/1/4″ seam allowances and provides separate pieces for the upper and under collar.  It is interesting to compare the two and see exactly where to remove the excess from a pattern that is the same for upper and under collar.  The corner edges of the collar which will be joined to the stand are not trimmed.

Under collar pattern has been placed on top of upper collar, matching CB position. Front edges of collar remain in the same position on both pieces. Narrow wedge trimmed from front edge.

Under collar pattern has been placed on top of upper collar, matching CB position. Front edges of collar remain in the same position on both pieces. Narrow wedge trimmed from front edge.

Under collar is approximately 3mm/1/8" narrower in CB and tapers towards front edge at neckline.

Under collar is approximately 3mm/1/8″ narrower in CB and tapers towards front edge at neckline.

The collar and stand pieces can be cut on either lengthwise or crosswise grain to use the fabric pattern to best effect.

They can also be cut using bias grain with the addition of a centre back seam – the interfacing can be cut on a more stable grain to keep the pieces in shape during the life of the garment.

Fuse the interfacing to each collar piece and both of the stands.  I prefer to use a woven fusible lawn which is lightweight but can be layered if extra stiffness or support is needed.

After fusing, reposition pattern piece and trim accurately. Fabric can stretch or distort during the fusing process.

After fusing, reposition pattern piece and trim accurately. Fabric can stretch or distort during the fusing process.

Tip:  Always test interfacing on a large scrap of fashion fabric to test stiffness and reaction of adhesive to the chosen fabric.

Tip:   To make a shirt collar stand up at the back, use extra interfacing in the back of the collar.  Cut and fuse an extra layer of interfacing to do this.  This piece of interfacing should be narrower at the outer edge of the collar then at the neck edge.

Additional interfacing to support collar if it is to be worn up. Draw position marks on pattern. Cut interfacing and fuse to under collar on top of original interfacing.

Additional interfacing to support collar if it is to be worn up. Draw position marks on pattern. Cut interfacing and fuse to under collar on top of original interfacing.

Transfer all pattern markings to the wrong side of the collar, stand and shirt neck.  For further accuracy lightly mark the collar attachment points, the curve of the seam at the ends of the collar stand and the seam allowances.

Tip: Make a cardboard or plastic template for the curved at the edges of the stand to ensure that they will be the same shape.

Collar Stays:

If your fabric is very soft, collar stays can be helpful in keeping the collar points sharp.

Mark the position and width of the stays on the pattern for the under collar.  Also mark the position of a buttonhole to allow insertion of the stay.

Mark position of collar stay and buttonhole on pattern and transfer stitching lines to right side of interfaced under collar.

Mark position of collar stay and buttonhole on pattern and transfer stitching lines to right side of interfaced under collar.

Stitch the buttonhole on right side of under collar and cut.  Place a piece of scrap fabric against the wrong side of the under collar and stitch the pocket for the stay.

Collar stay pocket on under collar.

Collar stay pocket on under collar.

The collar is then constructed as detailed below.

Construction Method:

Construct the collar, stitching from centre to each collar end and press (seams open first) with the upper side down. Edge stitch the outer edge of the collar if desired.  Carefully roll and mould it around a tailor’s ham.  Pin the collar to the ham, steam and set aside to cool.  See blog post  5th July, 2015 “Collars – Tips and Techniques”.

Before collar is inserted into the stand, stitch the neck edges together within the seam allowance.

Collar pressed in place and, with under collar uppermost, a small strip of upper collar is visible.

Collar pressed in place and, with under collar uppermost, a small strip of upper collar is visible.

To maintain correct placement when collar is attached to stand, place two bottom edges exactly together and stitch within seam allowance.

To maintain correct placement when collar is attached to stand, place two bottom edges exactly together and stitch within seam allowance.

When collar is placed on a flat surface, the roll of the upper collar becomes obvious.

When collar is placed on a flat surface, the roll of the upper collar becomes obvious.

Side view with upper collar on top.

Side view with upper collar on top.

Sandwich the shirt neck between both collar stand pieces – the collar stand pieces will be right sides together.  Pin along neck edge through all layers and stitch along the neck edge from end to the other.

If using a double yoke, tack both pieces together at neckline (on the garment side so tacking will not be caught in stitching). This will keep neckline edges together and minimise problems when attaching the stand.

If using a double yoke, tack both pieces together at neckline (on the garment side so tacking will not be caught in stitching). This will keep neckline edges together and minimise problems when attaching the stand.

Neckline edge sandwiched between the collar stand pieces and pinned in place. Pinning at right angles to the seam keeps everything in place well when stitching curves.

Neckline edge sandwiched between the collar stand pieces and pinned in place. Pinning at right angles to the seam keeps everything in place well when stitching curves.

Tip:  Use your left hand to smooth the shirt fabric under the collar stand as it comes up to the needle – be sure not to pull the fabric – the cut edges must all remain together.

When stitching, keep fingers under stand and smooth fabric at right angles to seam line as you proceed around the neckline curve.

When stitching, keep fingers under stand and smooth fabric at right angles to seam line as you proceed around the neckline curve.

Mark the centre front on both ends of stand.

Both ends of stand have CF and stitching lines marked.

Both ends of stand have CF and stitching lines marked.

Tightly roll the shirt front out of the way.

Roll the shirt tab edge tightly between the stand pieces.

Roll the shirt tab edge tightly between the stand pieces.

Pin the rounded edges together – place a pin right beside the tab at the front edge of the bodice to guide the position of the machine needle.  It is important not to stitch through the tab.

Wrap stand pieces over the rolled section and pin together at CF.

Wrap stand pieces over the rolled section and pin together at CF.

Fold back upper seam allowance and position a pin so that it lies right against, but not through, tap. This pin will help with positioning the machine needle to commence stitching.

Fold back upper seam allowance and position a pin so that it lies right against, but not through, tap. This pin will help with positioning the machine needle to commence stitching.

Both ends stitched from neckline to CF. Check the curves match.

Both ends stitched from neckline to CF. Check the curves match.

Using small stitches,  sew around the marked curve to the collar attachment point.  Repeat at the other end.  Grade the inside neck stand turnings to collar attachment point. Trim to 3mm (1/8”); clip the curves as needed and trim across the corners.

Trim the folded or pieced tab section between the stand seam allowances; clip across turn from neckline into stand.

Trim the folded or pieced tab section between the stand seam allowances; clip across turn from neckline into stand.

Clip the curved section quite close to stitching - this section may also be notched on thicker fabric. Do not clip the top of the band to CF as this can cause stress of that point when collar is attached.

Clip the curved section quite close to stitching – this section may also be notched on thicker fabric. Do not clip the top of the band to CF as this can cause stress of that point when collar is attached.

Tip: Do not clip to the end of the stitching.

Turn the work right side out and press, taking care not to stretch the unfinished edge of the stand.

Finished collar stand ends.

Finished collar stand ends.

Lay the shirt on a flat surface, with back closest.  Place the collar as it will ultimately sit, with upper collar on top and against the collar stand.  Flip the collar towards the inside section of the stand and pin the upper collar to  the inside neck of collar stand.  Match the centre back, shoulders and front edge with the collar attachment points.  Pin to the inside of the stand, leaving the outside stand free.

Shirt RS up on flat surface and collar in place as it will be worn.

Shirt RS up on flat surface and collar in place as it will be worn.

Collar flipped to inside neck edge and pinned with upper collar to inside of collar stand.

Collar flipped to inside neck edge and pinned with upper collar to inside of collar stand.

Machine stitch through all pinned layers, commencing and finishing exactly on the marked points.

 Tip: To avoid stretching the collar stand, I find it helpful to start stitching approximately 25mm /1” from the end of the collar to the opposite end.  I then reverse the work and stitch back to the original end.  Overlap the stitches rather than backstitching.

Start stitching with collar stand on top and approximately 3-4cm/1 1/2" from edge. Stitch to opposite end of collar. Turn work and stitch the remainder of seam towards the other end of the collar. This avoids the possibility of stretching the end of the stand when positioning the machine foot.

Start stitching with collar stand on top and approximately 3-4cm/1 1/2″ from edge. Stitch to opposite end of collar. Turn work and stitch the remainder of seam towards the other end of the collar. This avoids the possibility of stretching the end of the stand when positioning the machine foot.

Turn under the edge of outside collar stand 6mm (1/4”) and carefully press with the tip of the iron.

Turn in this edge and place the fold on the row of machine stitching.  Pin in place and slip-stitch or tack in place before top stitching the stand.

When making buttonholes, stitch buttonhole on inside of collar stand so that right side of buttonhole is showing when garment is worn open at the neck.

Cllosed at neck

Cllosed at neck

Back - collar stand rolls nicely with no hint of under collar showing.

Back – collar stand rolls nicely with no hint of under collar showing.

Collar turned up at the back

Collar turned up at the back

Side view with collar turned up at the back

Side view with collar turned up at the back

Binding Curved Edges

This article was first seen in Australian Dressmaking with Stitches magazine – Volume 20 No 12.
Permission has been sought and granted by Express Publications for electronic use and the photos and text remain the property of Alison Wheeler – Sewing Lady.

Binding a curved edge can be a frustrating task, particularly when the binding twists and puckers.   The following are the methods I use to prevent this from happening – no more frustration or puckering, just a perfect result every time!

To avoid show through from neckline and armhole facings, binding is a great alternative when using a lightweight and/or sheer/semi sheer fabric.

There are a number of things to consider when using a bias binding finish to curved edges.

Firstly is the thickness of the neckline edge.  If the garment has pleats of gathers, the edge will be thicker which will take up some of the bias trim width.  It would be wise to cut the bias strip wider to accommodate this extra thickness.

Secondly, the thickness of the garment fabric needs to be considered.  If using a lightweight fabric with thickness at the edge to be bound, it would be better to use a double binding technique.  The bias strip is cut four times the desired finished width plus two seam allowances.  If the fabric is heavier or firmer, a single binding may well suffice – cut the strips twice the finished width plus two seam allowances.  A small allowance in width to allow for the turn of the cloth may also be needed.

Tip: Whichever method is chosen, making a sample first is important to ensure a good final result.

I find that bias strips are best cut using a rotary cutter, mat and ruler – this results in strips with an even width and evenly cut edge.  If you have a pattern piece for the trim, measure its width and length and cut your strips slightly wider than needed and allow extra length to enable a bias join which is much flatter and less bulky.

If you do not have enough length in one strip, it is quite easy to join strips.  Simply cut several strips in the same width.  Place one strip right side up vertically on a grid; take another piece and place it with right sides together at right angles and to the right of the first piece.  Pieces are then stitched across the diagonal –hold threads to start stitching; use small stitches and do not back stitch.  Seams are trimmed to 6mm and pressed flat and then open.

Joining bias strips

Joining bias strips

As an aid to preventing puckers, I have recently been using a steam iron to “stretch press” the strips before preparing the binding.  This seems to prevent further stretching when the strips are applied.

You can either use a bias maker or carefully press under 6mm on each side of your bias strips.

Press under 6mm on each side - one at a time is best

Press under 6mm on each side – one at a time is best

My newly purchased Thermal Thimbles keep my fingers protected from the heat and steam.

Thermal Thimbles - a great idea!  Available from punchwithjudy.com.au or nancysnotions.com

Thermal Thimbles – a great idea! Available from punchwithjudy.com.au or nancysnotions.com

Once your strips are ready to be applied, take a look at the shape of the curve they will need to match.

Check the curve so bias can be prepared with steam

Check the curve so bias can be prepared with steam

Using an iron and steam, press the bias strips into the shape of the curve of the pattern piece.

Use iron to steam and press a curve - allow to cool before applying to fabric

Use iron to steam and press a curve – allow to cool before applying to fabric

When applying the bias to a neckline the inside curve is applied to the neckline.

Always stay stitch the neckline close to the seam line (using a small stitch length 1.5-2.0) before applying the binding.

If the outer edge of the binding is to match the finished edge of the neckline, the seam allowance of the garment will need to be removed before applying the binding.

If you are using satin or other tricky fabrics or applying a binding to a neckline edge with pleats or gathers, tacking the binding in place before machine stitching will really help in achieving accuracy.

Place the binding with right sides together at the curved edge.  Fold the start of the strip at right angles to the curved edge.

Start by folding leading end of trim at right angles to cut edge and start stitching

Start by folding leading end of trim at right angles to cut edge and start stitching

Start machine stitching away from the thickness of a seam line.  Continue right around the curve and lap approximately 2cm over the folded trim at the start.

Lap approximately 2cm over the stitched trim and stitch in place

Lap approximately 2cm over the stitched trim and stitch in place

Once the stitching is complete, trim seam allowance slightly narrower than the desired binding width and gently roll folded edge of binding to the stitching line.  Place pins at right angles to the seam when holding the fold in place.  Tack in place.

Once trim has been rolled over edge, tack in place before hand stitching

Once trim has been rolled over edge, tack in place before hand stitching

Tip:  To avoid puckers and wrinkles, it is critical to make sure that fold is brought directly to the stitching line and does not slide to either side before it is stitched in place.

Invisibly hand stitch by placing hand needle under a machine stitch and taking a stitch through the underside of the folded edge of the bias.  Make several stitches and then pull the thread to make the binding roll into place.

Hand stitch from just under the fold to the seam stitching

Hand stitch from just under the fold to the seam stitching

Tip: To keep the binding edge looking softly rolled, be careful not to press the binding flat.

I hope this will be useful as we get ready to sew some lovely cool lightweight tops for the summer which will be with us before we know it.

How Can We Make Commercial Patterns Fit?

This article was first seen in Australian Dressmaking with Stitches magazine – Volume 20 No 4.
Permission has been sought and granted for electronic use and the photos and text remain the property of Alison Wheeler – Sewing Lady.
I started teaching dressmaking in 1998 and, right from the beginning, I was determined that I would not allow students to make garments which did not fit them -to do so would be very counter-productive, especially those who are beginning to learn how to make their own garments.

Finishing a simple garment which fits well and you are proud to wear is the goal of sewers of all levels of ability and greatly contributes to our pleasure in achieving good results with new and different techniques.

Achieving a good fit is probably one of the most vexing issues for sewers.

The major commercially produced patterns use a set of measurements which represent “ideal” figure proportions.  This method ensures standards of commonality across the various designs and brands and is important in keeping mass produced patterns relatively affordable.

Over the last 40 years since the measurements were standardised, body shapes and sizes have evolved and changed along with women’s lifestyles and attitudes to exercise – all of which contribute to the need to customise commercial patterns to fit the individual.

In an effort to make altering patterns easier, lengthen and shorten lines and multi size patterns have been incorporated over the years.  The Palmer/Pletsch patterns in the McCall’s catalogue and Today’s Fit by Sandra Betzina in the Vogue catalogue give expanded instructions covering how to alter for fit.todaysfit palmerpletsch melissawatson

There are also excellent reference books and DVD’s on pattern fit and alteration available.

After 17 years of fitting people, I am yet to meet the person who does not need at least minor pattern alterations.  Many home sewers who learned to sew when they were in their teens never really learned about fitting since the patterns they used rarely needed much alteration apart from length.  However, with maturity comes many figure changes and unless there are minimal differences in the body shape and the chosen pattern, it can be quite frustrating to accomplish a good fit.

With some knowledge of simple techniques, this situation can be overcome so that the pleasure of making and wearing an individual garment which suits the wearer and fits well will be experienced again.

From my experience in fitting many women in many and various patterns, I have come to the conclusion that an organised approach utilising a combination of flat pattern measurement comparison, tissue fitting and making a toile is the best way to achieve success.  Once a pattern is altered to properly fit, it can be used as a basis to assess other patterns or as a basis for different styles.

A good place to start can be to make a fitting shell – patterns are available from all the main commercial pattern brands.

Vogue 1004 Fitting shell useful for bodices and skirts

Vogue 1004 Fitting shell useful for bodices and skirts

Palmer Pletsch Dress

The assessment of correct fit is subjective and depends on a number of things:

  • personal interpretation of appearance and comfort
  • posture of the wearer
  • style choice
  • fabric used

When making pattern alterations, the key points to remember are:

  • make one alteration at a time and re-check on the wearer after each alteration is completed
  • alterations need to be done where the problem is happening – this is not always at the side seam!

Style Choice:

  • Styles which are meant to be worn with a tighter fit often require more alteration than looser fitting styles
  • Selection of a style which will flatter the wearer’s figure and highlight the most pleasing features is really important
  • When determining the fit, skimming the figure rather than swamping it with lots of loose fabric will always be more flattering – whatever the wearer’s size

Pattern Choice:

  • Many fitting issues arise because the design and shape garment is unsuitable for a particular body shape
  • Choosing a pattern with vertical seams, for example an armhole or shoulder princess style, will make width alterations much easier while maintaining the original proportion of the style lines

Pattern Size:

  • For garments which hang from the shoulders, select size by high bust measurement
  • For garments which start at or below the waist, select size by hip measurement
  • Take hip measurement approximately a hand span from natural waist
  • If figure has a fuller tummy, high hip is needed as well and note how far down from waist that measurement is taken
  • If fullness is in the upper thigh area, ignore this when selecting size and use the hip measurement as above

Fabric:

  • It is sometimes necessary to alter a garment because of the type of fabric used
  • Make sure that the stretchiest part of the fabric (usually the crosswise grain or weft) is going around the body
  • If using Bengalene™ and some other woven fabrics with stretch threads made from Spandex™ or Elastene, check to see that the stretchiest part of the fabric is not parallel to the lengthwise grain – if it is, the pattern needs to be cut with the grain line at right angles to the selvage to ensure a comfortable fit
  • The stretch threads woven into these fabrics are for wearing comfort and to reduce the fabric wrinkling during wear and are not usually factored into the fit
  • When purchasing stretch wovens, it is important to check the recovery of the stretch threads
  • Sometimes garments made from these fabrics will shrink with washing and grow during wear
  • Stabilising either facings is important with these fabrics
  • Even if fabrics do not have stretch threads added, different weaving methods will result in natural elasticity of the fabric, for example:
    • crepe weave has more stretch than twill (gabardine) weave
    • loose weave fabrics have more stretch than tighter weaves
    • thin fabrics will give more than thicker fabrics
  • If you are unsure about the fabric will behave during wear, cut wider seam allowances on vertical seams to allow for adjustment during fitting

Key Measurements and How They Equate to the Flat Pattern:

  • Measurements should be taken wearing the undergarments and shoes which will usually be worn with the garment to be made (Shoes are important because the height of the heel can alter the stance of the wearer affecting the posture and thus the hang of the garment.)
  • Check that tape measure has not stretched – they are quite cheap to replace
  • The tape measure should be firm against the body but not tight
  • With horizontal measurements, keep the tape measure parallel to the floor
  • Tie a piece of cotton tape or narrow elastic around the body at natural waist level
  • Take the following measurements:
    • High bust – across the broad of the back and above the bust
    • Bust
    • Shoulder length from base of neck to shoulder bone
    • Shoulder to bust point – from base of neck to bust point
    • Bust separation – distance between bust points
    • Shoulder to shoulder – front and back
    • Chest width – from crease where arm meets the body
    • Back width – from crease where arm meets the body
    • Back length to waist – from nape of neck to waist
    • Bicep – place tape around arm with top of tape at point where arm meets body
    • Cap Height – from top of tape placed as for bicep measurement up to shoulder bone
    • Waist – often easier to find waist at the back
    • High Hip – note measurement down from the waist where this measurement is taken
    • Full Hip – usually a hand span from the waist – also note the measurement down from the waist where this measurement is taken
    • Side length from waist level to finished hem
    • Side length from waist level to knee
    • Crotch length – from front waist, between the legs and up to back waist
    • Crotch depth – using a dressmaker’s square placed between the legs, approximately 1.5cm from body, measure depth to the level of natural waist
    • Thigh at fullest part – keep tape measure parallel to the floor
    • Knee measurement level with the crease at the back of the knee
    • Calf measurement at fullest part

      It can be difficult to take your own measurements accurately.  A sewing buddy can be a great help.

      It can be difficult to take your own measurements accurately. A sewing buddy can be a great help.

  • These measurements can then be compared to the corresponding finished pattern measurements to assess possible preliminary alterations prior to tissue fitting and/or making a toile – even if measurements are not made before tissue fitting, assessment of differences between the body measurements and pattern measurements will give an idea of where to focus when looking at fit

Length alterations:

  • Horizontal alterations are needed to ensure garment shaping is in the correct place for the person wearing the garment
  • These include:
    • Position of darts/bust shaping in relation to bust point
    • Natural waist position
    • Crotch depth to cater for full abdomen or derriere
    • Finished garment length – including sleeve length

Provision for Width Alterations:

  • Width alterations need to be applied where the fitting problem occurs, for example full bust, abdomen, tummy, thighs and calves
  • Provision for these alterations during the tissue fitting step can be accommodated by allowing larger seam allowances on side seams and inseams

Tissue Fitting:

  • Be sure all seam allowances are marked on the pattern tissue and allow additional width in seam allowances on side seams and inseams
  • Apply Magic Tape™ around the curved seams – armhole, neckline, crotch seam lines – tape is placed on the garment side of the seam and not in the seam allowance
  • Clip seam allowances so tissue won’t tear
  • Pin darts/pleats in place on the outside of the tissue
  • Pin front to back at side seam and inseam – place pins parallel to the seams and pointing towards the hem
  • Carefully try on the tissue

Making a Trial Garment (Toile or Muslin):

  • After making alterations indicated from the assessment of the tissue, cut out the front and back of the garment as well as any pieces which form part of the garment, eg yoke, slash pocket pieces
  • Use a fabric which is similar in weight, thickness and drape to what will be used in the garment
  • Mark grain lines on the fabric
  • Mark horizontal lines at right angles to the grain line
  • Stitch using long straight stitch and slightly looser tension
  • Stitch darts/pleats and insert zipper in centre back
  • Fold hem to desired length
  • Try on garment

 Assessing the Garment:

  • Stand as you would naturally
  • Look for wrinkles, folds or pulls in the fabric to indicate areas which need alteration
  • Use a hand mirror and full size mirror to assess the back
  • Mark areas to be altered directly on the tissue and toile

Order for Alterations:

  • Start at the top of the garment (shoulder and neck area for tops; waist for pants and skirts)
  • Whether I start at the back or the front depends on the area most in need of alteration
  • Work on one thing at a time – it is all about cause and effect – trying the garment again between each individual alteration

Fitting a basic dress is a good place to start as this will help you identify your challenges.  Unfortunately there is no magic formula; even if you know what type of alterations you regularly need to do the amount will often vary because of design ease.  However, the more you practice pattern assessment and alterations, the easier it becomes.

I urge sewers to give this a try as there is no substitute for actually doing.  If you are worried about wrecking your pattern, trace it on the greaseproof paper first and remember it is only paper!

Collars – Tips and Techniques

Portions of this article were first seen in Australian Dressmaking with Stitches magazine – Volume 22 No 5.
Permission has been sought and granted for electronic use and the photos and text remain the property of Alison Wheeler – Sewing Lady.

Collars make a statement and give garments a great style lift.  They frame the face of the wearer and I hope that using these tips will help you create a beautifully finished collar.  It is worth trying a few different styles to find the one which suits your face.

Because most collars have a seam at the outer edge, a great opportunity presents to include contrast or matching piping, edging lace or scalloped braid to really make the collar a focal point of garments.

Rolled (blue)and standing (white) collars

Rolled (blue)and standing (white) collars

Types of Collars:

While it is certainly possible to use a single layer collar, generally collars consist of two parts – the upper collar (the side that is seen) and the under collar (the underside) and can be designed in many different shapes but fall into three main types:

  • Flat collars which sit perfectly flat against the garment

    Flat collars

    Flat collars

  • Rolled collars which roll gently out of the neckline

    Rolled collars

    Rolled collars

  • Stand collars which stand up from the base of the neck

    Standing collars

    Standing collars

Interfacing:

Most collars require inner support so that they will hold their shape for the life of the garment.

This support is usually provided by interfacing.  There are many interfacings on the market and, from my observations, much confusion about how and where to use the different types and weights available.

Tip:  Always test the interfacing on a scrap of your garment fabric cut on exactly the same grain as your pattern piece before working on your garment so that you can assess its effectiveness in giving the support needed for your particular fabric. 

The pattern guidelines will usually say to interface the under collar only; however, if more support is necessary because of the weight of the fabric or style of the collar, it can be helpful to interface both collar pieces – perhaps a lightweight woven fusible on the upper collar and a slightly heavier knit fusible on the under collar.  The possible combinations are endless which is why testing a few different interfacing applications is so important in finding what will give you the result you are after.

Tip:  It is often useful to layer interfacing if more support is needed.  Simply fuse the first layer and allow it to cool and dry and then apply another layer for either the whole collar or the middle of the neck area to keep the collar standing in place if the fabric is floppy.

For a shirt collar, I would recommend using a fusible cotton batiste interfacing cut using the same grain line as the collar pieces. In the case of a sheer or silky fabric where fusible interfacing is not appropriate, silk organza also cut from the same grain as the collar pieces can be hand tacked within the seam allowances and before the collar is constructed.

For dress and jacket collars, I usually prefer a fusible knit interfacing (usually light weight) which gives the collar support but keeps it soft and allows subtle shaping.  However, should your garment have a dramatic collar or your chosen fabric be heavy, heavier Shapewell ™ (sew in, not fusible) or hair canvas can be used for the extra support required keep the collar in place as designed. (See blog posted 21st June 2015 Donna Karan Jacket Vogue 1263 – Part 3)

Flat Collars

While not as common in today’s fashion, flat collars are an interesting addition to the neckline of a vest or a summer dress or top, especially when a contrasting colour and lighter weight fabric are used.

They can circle the whole neck or be applied to the front section of the garment only.  You can also use virtually any shape for the outer edge, for example scallops, points, square corners or sailor collar.

They exactly replicate the shape of the garment neckline and should lie flat against the garment.  Depending on the fabric being used, they quite often do not need the support of interfacing.  To keep the collar soft and sitting flat against the garment, a lightweight fabric lining fabric can be used as the under collar.  Fine cotton or silk organza are good choices for this purpose.

The neckline is either finished with a facing or using bias binding for a neat, smooth finish.

Rolled Collars

Some patterns will have two separate pieces for the collar – an upper collar and an under collar.  The upper collar is slightly wider in the centre back section to allow for the turn of the cloth.  Collars made using a slightly smaller under collar roll nicely and do not allow the under collar to show at the outer edge.

If your pattern has one collar piece which is to be placed on the fold and cut twice, it is a good idea to trace the pattern piece on to a folded piece of greaseproof – place the fold line marked on the pattern on the fold of the paper, pin in place and cut out – this gives a pattern piece for the whole collar which can be cut on double fabric, making it much easier to have accurately cut pieces.

Place pattern piece with folded paper underneath to cut full collar piece

Place pattern piece with folded paper underneath to cut full collar piece

Tip: Marking and naming the match points on your pattern is a great help in working out what goes where when putting the collar and neckline together. 

Mark and identify match points

Mark and identify match points

Collars can be cut with the grainline parallel to either the crosswise or lengthwise grain or even on the bias when using a plaid or striped fabric.  If you decide to change the grain line in this way, be sure to cut your interfacing on the grain line suggested in the cutting layout so that the collar will sit as intended.

To achieve a separate upper and under collar when the pattern provides only one piece for both,  trace a second copy of the collar and mark it “under collar”.  Trim a scant 3mm from both ends of the collar.  Mark the centre back and measure and mark a point up 6mm* (see Tip below) from neck edge and reshape the neck edge.

New cutting line for under collar

New cutting line for under collar

Difference between upper and under collar pieces at neckline and front edges

Difference between upper and under collar pieces at neckline and front edges

Tip: The amount removed from the neck edge is determined by the thickness of the fabric. * For lightweight, remove 6mm and for thicker fabric as much as 12mm.  To test, cut two pieces of fabric (on the same grain); stitch one edge together;  grade and press the seam and fold the joined pieces in half.  Have a look at how much difference there is on the width of the upper fabric – this is the amount of the turn of the cloth.    

Fabric with no interfacing

Fabric with no interfacing

Interfaced fabric

Interfaced fabric

Standing Collars

Standing collars usually sit slightly away from the neck and can vary in width.  Checking the width of the finished collar before proceeding will result in a garment that is comfortable to wear as sometimes these collars can be too wide for the wearer.

These collars are applied directly to the neckline and are self-finished – the inside neckline edge is folded under and stitched in place, removing the need for a facing.

In the case of shirt collars, the collar band should sit close to the neck when the button is fastened (even if the garment is to be worn with the neckline open).  The collar is sandwiched between the top edges of a standing collar and the inside neckline is finished in the same manner as above.

Construction Tips

Regardless of which collar type is being applied, be sure to stay stitch the neckline directionally before applying the collar (see blog post 26th April, 2015 – Stay stitching and Under stitching)

Directional sewing is important for a symmetrical collar so that both sides of the collar end up the same shape.  Pin the upper and under collars together at centre back and stitch from centre back to neck edge.  Turn the collar over and repeat on the other side.

Diagrams 4-9 - Copy (2)

Seams need to be trimmed, graded, clipped and/or notched so that the collar edges will sit flat.

Seam allowance against under collar is cut smaller

Seam allowance against under collar is cut smaller

Press the seam flat as sewn and then press the seam open (using a point presser makes this much easier).

Press seam allowance open over point presser

Press seam allowance open over point presser

Before collar is applied to the neckline, bring the neck edge of both collar pieces together and tack in place.   Pin the collar around a ham and steam to establish the roll of the collar Replacement for Diagram 4 – allow to dry and cool thoroughly before removing the collar from the ham.

Special Technique for Pointed Collars:

    • Start sewing in the centre back of the collar and sew to within 2cm of the corner point
    • Reduce stitch length to 1.5 and make sure needle stops in the fabric
    • Stitch to the turning point and leave needle in fabric
    • Raise presser foot and turn fabric 45⁰
    • Take a piece of scrap thread approximately 30cm long and, holding one end in left hand, take other end in right hand and pull it between the fabric layers and tight against the needle
      Leave needle in fabric and wrap thread ahead of needle

      Leave needle in fabric and wrap thread ahead of needle

      Tuck thread between layers

      Tuck thread between layers

    • Holding thread ends in left hand, wind hand wheel one stitch and leave needle in fabric
      Thread is caught between stitches and can be pulled against needle before being tucked between the layers

      Thread is caught between stitches and can be pulled against needle before being tucked between the layers

      Wrap thread back around the needle and take stitch across the corner.

      Wrap thread back around the needle and take stitch across the corner.

    • Raise presser foot and bring thread back in front of the needle and take both threads to the left, between the fabric layers Diagrams 4-9 - Copy (4)
      Stitching end of collar - thread is between upper and under collar pieces

      Stitching end of collar – thread is between upper and under collar pieces

      Stitched collar - small stitches around the point reinforce the seam which is clipped quite close to the stitching.

      Stitched collar – small stitches around the point reinforce the seam which is clipped quite close to the stitching.

    • Stitch towards the neck edge – 2cm at the small stitch, then at regular stitch length

      Stitching end of collar - thread is between upper and under collar pieces

      Stitching end of collar – thread is between upper and under collar pieces

Trim the seam allowances as above and clip the corner points

Clip corner

Clip corner

Seam allowances are trimmed so that they meet in the corner with no overlap and no gap

Seam allowances are trimmed so that they meet in the corner with no overlap and no gap

  • Press the seams open using the point presser
  • These threads can be left in to help with edge-stitching later 

Attaching Collar to the Neckline:

  • Carefully keeping all cut edges together, pin the collar to the garment neckline, matching centre back, shoulders and centre front

Tip: Tacking the collar and facing in place by hand before stitching makes it easier to manoeuvre easily around the neckline with no pins in the way.

  • Apply the facing and stitch through all layers (garment, collar and facing) using a longer stitch length to accommodate the thickness of the layers
  • Trim all seam allowances by half and clip garment and facing seam allowances as necessary so enable the seam to lie flat
  • Press carefully and under stitch, catching all seam allowances to the facing (see blog post 26th April, 2015 Stay stitching and Under stitching)
  • Turn facing to inside of the garment and hand catch to the seam allowances

Tip:  When using lightweight or sheer fabrics, bias tape can be used in place of a facing.  Simply tack collar to neckline as above.  Open out one folded edge of the bias tape and place right side of bias tape against upper collar with the crease on the bias tape along the seam line. Stitch the tape in place and trim seam allowance.  Roll the tape to the inside of the garment and either machine or handstitch to the garment.  The collar will hide the stitching when the garment is being worn.